Interface functionality: managing screens

Contents
In Axiell Designer there are two ways to manage screens: through the Application browser, or through the Screens manager (see Accessing screens). In both ways you are able to create new screen files, delete or save screens, move or copy them to other folders, and open them for editing in the Screen editor.
Where to find a particular screen
Screen files may be located in different subfolders of your Axiell software folder. Typically you can find them in \screens, \data\zoom, or folders with an application name like \wincat, \library, \museum plus, \xplus etc.
If you are searching for a particular detail screen that you saw in your running application, you can look up its name in that running application by hovering the mouse cursor over de screen header in Collections. In the bottom left corner you'll notice a tooltip appearing, indicating the the relative path and file name of this screen, e.g. ...&screenPath=../screens/objman (where objman.fmt is the screen file name). If there is no relative path in front of the file name, it means that this file can be found in the current application folder.
To search for a screen name in the tree view of the Application browser, choose Edit > Find (Ctrl+F) or click the button for it:
![]()
In the Search for entry field, type any name or part thereof that you want to search in all of the text displayed in the Application browser tree view.
If the term you type is only part of a word or words you look for, then deselect the Match words option.
Leave the Match case option deselected if upper and lower case are not important while searching.
Click Find to start the search. A found term is highlighted. To search a next appearance of the searched term, each time click Find next, press F3 or click the button for it:
![]()
A screen file may be referenced more than once in your Axiell Collections applications. To find all these references, before you start editing a screen for example, you could use the Designer Object searcher. (Search the Object category: Screen, for the name of the screen file, e.g. booka, in the File specification: Applications.)
When you already know in what folder to look for a screen, you may still not quickly find that screen because the list is long and unsorted. Sorting the list makes finding your file a lot easier.
The files under a folder node in the Application browser (not the objects in an application definition) can be sorted alphabetically. Just right-click a folder node and choose Sort in the pop-up menu. You can only sort on the descriptive names here, not the file names, but the file names are displayed too.
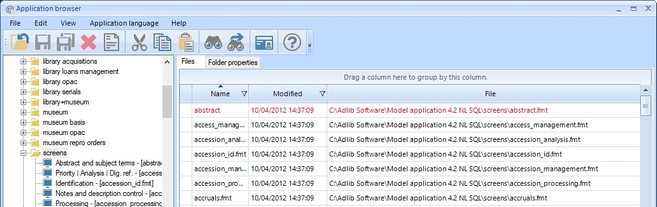
The Application browser also presents a Files tab for selected folders, basically a grid view showing the internal name, modification date and file name of screen files. This grid view allows for filtering and better sorting of all files in the folder to quickly find the file you are looking for. Double-clicking a file either opens the file or leads you to the file in the tree view on the left. The view is particularly useful for folders containing lots of items, such as the \screens folder. Items in red indicate items for which access rights have been set.
In the Screen manager on the other hand, you have more sort options: you can sort on the screen file names, the descriptive names, the needs-saving markers, or the last-modified dates, by clicking the appropriate column header once or twice (for an ascending or descending sort).
Copying and moving
In the Application browser you can move or copy screen files or screen references to another location, but only one at a time (or you could try copying an entire folder). Moving can be done by cutting and pasting or by simply dragging the object.
Right-click an object and choose Copy (Ctrl+D) or Cut (Ctrl+Y) in the pop-up menu. Then select another list or folder, right-click it and choose Paste (Ctrl+I) in the pop-up menu.
Screen references should only be copied or moved to other lists of screen references, while screen files can be copied or moved to any folder node.
When you paste an object that is part of an application definition, it will never overwrite the other selected object or another object with the same name in that list.
As mentioned, you can also drag objects from one list or folder to another (to where the mouse pointer displays a +), or in the same list. (Dragging means clicking an object, keeping the left mouse button pressed down, and moving the object some place else, and then releasing the mouse button.) Dragging a screen file to another list or folder means copying it. Dragging an application object to another place in the same list, means moving it; this is relevant for the data sources list a/o, because the order of this list is the order in which it is presented to the user in the running application.
In the Screens manager, copying and moving is somewhat more clear-cut. First of all, you can select one or more screen files simultaneously: either hold the Ctrl key down as you click each next file to be selected, or hold down the Shift key as you click the last file to be selected if you want all files between the previously selected file and the last to be selected at once. Then right-click the selection, or open the Edit menu, and choose Cut (Ctrl+X) or Copy (Ctrl+C). Then select another folder, and paste the selection through the Edit menu.
Creating screen files and screen references
To create new screen files in the Screens manager you must first open the folder in which you want the new file to be inserted. Then just click the Create a new screen button:
![]()
When you create a new screen, you will be asked for the name that the file should get. Enter the name for the new screen, without extension. This is the name of the physical (.fmt) file, not the title of the screen. After you've provided a name, the file is created and you can directly start editing it.
In the tree structure in the Application browser you can create new screen files and screen references.
Select the folder in which you want to create a new screen file, and create the object through File > New, or right-click the folder and choose the new object through the New option in the pop-up menu. In the Application browser, new screen files can only be created from a folder node.
What objects are available in the New menu depends on the node that you selected.
From a data source node (or the Screens node underneath it) or a method node in an application definition, you can create references to existing screens: just right-click the node to which you want to add a screen reference and choose the type of reference you wish to add (this is because Collections cannot tell from the screen file itself, what its intended use is, for detailed display or brief display for the Result set view).
In the Application browser there is a handy feature for creating screen references to existing screen files, wherever those files might be located.
| 1. | First open the appropriate application definition node so that the data source or method to which you want to add a screen reference is displayed in the tree view. |
| 2. | Then also open the folder that holds the screen file to which you want to reference. |
| 3. | Click the desired screen file and drag it to the destination data source or method. The tree view will automatically scroll up or down as needed. |
| 4. | When you release the mouse button a small dialog pops up, asking you which type of reference you wish to create. Choose the type corresponding with the dragged screen file, and the correct screen reference is then created for you. Automatically the proper relative path (if any) to the screen file will be retrieved, for the screen reference property. |
Opening screens in the Screen editor
You can open more than one screen in the editor, either by switching back to the Screens manager or Application browser (without closing the Screen editor) and double-clicking another screen, or by opening a new screen file in the editor. Each screen is presented on its own tab, and you can switch between them by clicking the tab labels.
Note that you can also start a new screen from within the Screen editor. It will be created in the currently opened folder.
![]()
Just click the Create a new screen button, and then enter the name for the new file, without extension. Screen file names are no longer limited to 8 characters.
Deleting screens
In the Application browser or in the Screens manager, select a screen file that you want to delete - in the Screens manager you can select more than one file - and either choose Edit > Delete, or right-click the object and choose Delete in the pop-up menu, or click the Delete button:
![]()
Deletion of files is currently permanent: you cannot restore deleted files from Windows' recycle bin. Deleted sub-objects within the application definition (like screen references), can be restored by not saving the changes in the concerning .pbk file when you close Designer.
It's possible to generate documentation about the currently selected screen file in the \screens folder, about all the screen files in the \screens folder at once or about the currently selected screen reference in a data source in the .pbk: right-click either the file or the \screens folder in the Application browser or right-click a screen reference underneath a data source in the .pbk in the Application browser and choose Create documentation in the pop-up menu. A Documentation window will be opened with a detailed description of the structure of the selected screen(s).
What is presented can be selected in the View menu. You can print the displayed details via the menu or the Print documentation button, or save it.
You may also select the text, or part of it, with the mouse cursor, and copy (Ctrl+C) and paste it (Ctrl+V) in any other document.
Screen information formats available from Designer 7.11:
Conditional Display Fields List (obsolete definition) (CSV) - A list of all fields with an outdated read-only or suppress condition in their screen definition. These outdated definitions should be converted into a current definition to work in Collections (click here - caption ‘The Copy button’ - for more information).
HTML Screen Fields List (CSV) - A list of all HTML fields defined on screens.
Mandatory Fields List (CSV) - A list of all mandatory or ‘mandatory in group’ fields on screens.
Obsolete Screen Elements List (CSV) - A list of all outdated screen elements with their properties (List Field, Image, MenuOption, System, TextWindow, WebBrowserControl, Button). These screen elements are not supported by Collections. Use this report to identify which screen elements can be removed from the application, or replaced by other application definitions with similar functionality.
Screen Field Group List (CSV) - A list of all fields with group numbers in their screen definitions. Group number are supported by Collections, but field groups should preferably be defined in the database’s field definition, using a group name. Screen group numbers could potentially be conflicting and should be avoided. Use this report to identify these outdated group definitions, so they can be removed.
Screen Fields List (CSV), Screen Fields List - Dutch (CSV), Screen Fields List - French (CSV), Screen Fields List - German (CSV) - A list of all fields on the screens, with their properties. The language list versions include screen and field label translations for the selected language.
Screen Info - Comparison Mode - Dutch Only (XML), Screen Info - Comparison Mode - English Only (XML) - All screen properties in an XML structure, optimized for the comparison of screen definitions. It only lists the texts and labels in the selected language. A screen comparison using this report therefore ignores differences in translations. This report does not contain any metadata information on the screen definition file itself, since this is not part of the screen design.
Extra screen information formats available from Designer 7.13:
Legacy Only Boxes List (CSV) - a list of all boxes which contain ‘Adlib Legacy Only’ fields. Such fields are not displayed in Axiell Collections.
Table Grid Boxes List (CSV) - a list of all boxes which display fields in a table grid view, using the Edit link group on demand setting.
Note that the Documentation window display doesn’t respect the line endings in the generated .csv file, but that the file does contain line breaks, as you can see when you save the file as a .csv file and open it in MS Excel.
Also note that, to save this documentation as a .csv file, in the Save documentation as dialog you have to type the .csv extension behind the desired file name and set the Save as type option to All files.
See also
Editing screen object properties