Release notes 7.5

Contents
Below you'll find a brief overview of new functionality implemented in Axiell Designer 7.5, including links to more information. For some notes on compatibility issues see the Axiell Designer compatibility topic.
New Designer settings may pertain only to adlwin.exe-based Adlib applications, only to applications run within an Axiell Collections environment or to both, as will be noted explicitly in the documentation for each setting. New settings which do not pertain to Adlib for Windows, should have no negative effect on the operation of this software as long as you use Adlib for Windows version 7.5.
Contents
New Word template format support
Creating tasks for Axiell Collections
A format string for reverse relations
New grid view for Adlib folders
Screen table (grid) views for faster performance
New Word template format support
As you may know, for an output format in Adlib for Windows you can use an XSLT stylesheet, an adapl, a Word template, a combination of adapl and Word template or a combination of adapl and XSLT stylesheet. In Axiell Collections, the possibilities are a bit more limited though: Collections does not support output adapls using print and output statements to print stuff, nor does it support Word template output formats with the .dot and .dotx extension (which are the formats supported by Adlib for Windows).
The good news is that Collections and Adlib for Windows 7.5 do support Word templates with the .docx extension (which wasn't suported at all before) and Collections also supports output adapls using the wordcreatedocument function (to print from a .docx template), output formats which have been specified as a combination of an adapl and a .docx template, and it also supports XSLT stylesheets as output formats.
So the Template path option in the Output job properties now accepts templates with the .docx format.
Old .dot or .dotx templates can be converted to .docx templates fairly easy. See the Installation and configuration of Axiell Collections manual for more information about that.
Creating tasks for Axiell Collections
Certain bulk editing procedures hard coded in Adlib for Windows will get a more flexible setup and functionality in Axiell Collections. We call these bulk operations "tasks" and you can set them up via Axiell Designer in combination with custom adapls and screens. Tasks must be defined per data source in an application structure definition (.pbk). You can specify as many tasks as required. Let's implement a Change locations task (similar to the procedure in Adlib for Windows) which is meant to allow the user to change the current location of a selection of objects at once and update the location history of those object records at the same time. We already made the required adapl and screen (available for download here). You only still need to set up the task in your application if the Change locations task is not available in your Collections application yet.
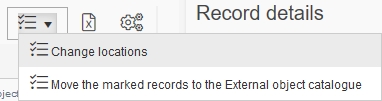
However, let's start at the beginning to show you how everything comes together. Imagine a Run task icon being available in the context toolbar above the result set in Collections, with which you can select and run any of the specified tasks. If multiple tasks have been specified, a tasks list opens to allow you to select the desired task, while if just a single task has been specified then the relevant task screen opens immediately. If no records have been marked, the task will run on the currently selected record, while if records have been marked, the task will run on the marked records.
After a task has started, a screen will open allowing the user to enter data relevant to the task, after which clicking OK will run an adapl program that will be executed for the selected or marked records in the result set, processing the entered data into each record. So the adapl must fill in the new current location and update the location history. To get entered data from the task screen to the adapl we must define so-called parameters per task as if they were fields and use these parameters as task screen field tags on the screen and as source field tags in a special PARAMETERS FACS declaration in the adapl. Although these parameters look a lot like normal fields, they must be set up in the application definition, per task, instead of in the database definition and therefore they have no relation nor interference with the normal database fields.
| 1. | In the case of the change locations procedure we rebuilt the Adlib for Windows dialog as a screen and assigned some parameters as field tags. We chose P1 for the new checkbox and existing Collect field tags for the other fields (because we've copied those fields anyway), but we could have chosen any twelve two-character parameters for this particular purpose: no need to check the database definition of Collect per se. We called the screen changelocationtask.fmt but any other descriptive name would have been fine too.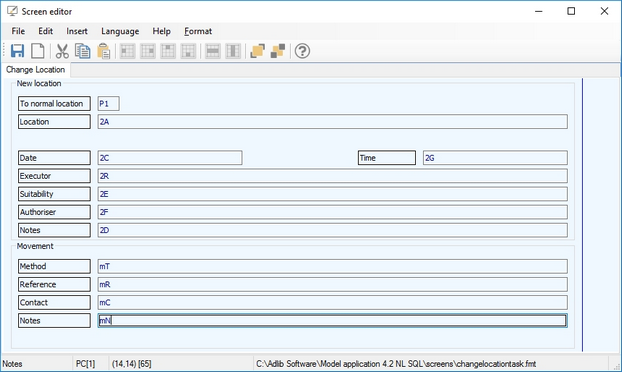 Note that during operation the Location field is hidden as soon as the user marks the To normal location checkbox, because of the field suppress condition P1 != '0'. (Here in Collections, logical field expression values are treated as an integer, so the Adlib compatible P1 != '' wouldn't work here.) |
| 2. | We created a ChangeLocation.ada/bin adapl to process the data from these parameters into each selected record. The .ada is readable in a text editor like Notepad++ and documented well, so you can open it if you'd like to see how it is programmed or if you'd like to make changes to it. Without going into too much detail here about the adapl, it suffices to say that the adapl is structured like an output adapl: it is run for each record separately and therefore has direct read access to all field tags from the processed record. To be able to write altered data to these tags, we could have used a FACS declaration but instead we chose to write to the _LOCAL FACS buffer, which has the same result but is a more concise way of programming this adapl. The only FACS definition really required is the one for PARAMETERS (always use this name): fdstart PARAMETERS '' P1 is PARAMETERS_tonormal 2A is PARAMETERS_location 2a is PARAMETERS_locationlref 2C is PARAMETERS_date 2G is PARAMETERS_time 2R is PARAMETERS_executor 2E is PARAMETERS_suitability 2F is PARAMETERS_authoriser 2f is PARAMETERS_authoriserlref 2D is PARAMETERS_locnotes mT is PARAMETERS_method mt is PARAMETERS_methodlref mR is PARAMETERS_reference mC is PARAMETERS_contact mc is PARAMETERS_contactlref mN is PARAMETERS_movnotes fdend As you can see, the FACS declaration treats the sixteen parameters as if they were regular field tags and assigns aliases to them so it's easier to work with them. There's no need to OPEN this FACS declaration since it is not a real database: after this declaration we can just use the FACS parameter aliases as if they were normal FACS field tag aliases. |
| 3. | In the Designer Application browser, open your application definition and the data source under which the task must become available, the Internal object catalogue for example (and/or the External object catalogue and the Archives data sources, when it comes to the change locations procedure). Right-click the data source and select New > Task in the pop-up menu.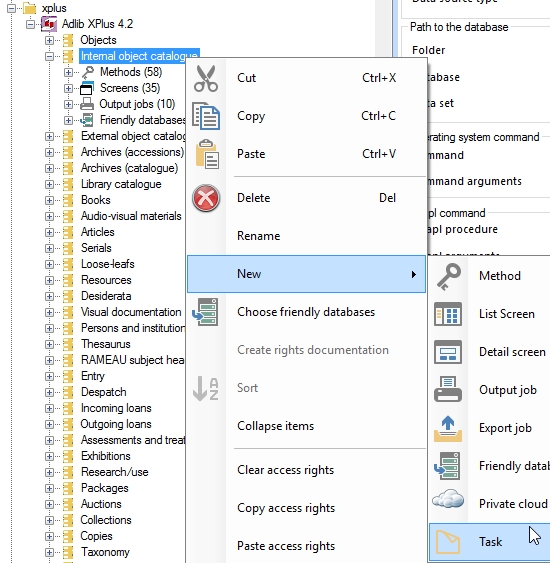 |
| 4. | Select the new task and on the Task properties tab, set the path to the screen and the adapl created for this task. Also set a descriptive menu text in as many translations as your application needs to be available in. Make sure that at least the English menu text is unique, so there shouldn't be another task in this data source with the same English name. 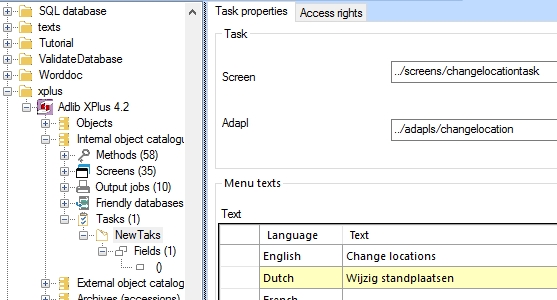 |
| 5. | Finally, define all used task parameters underneath the Fields header of the new task in the tree view. For each parameter that has no correlating field definition in a database definition somewhere, right-click the Fields header underneath your new task and select New > Field in the pop-up menu to create a new field definition, like you would for P1. Task field definitions which can be copies of existing database field definitions, can simply be copied from those database definitions and pasted underneath the task Fields list, also using the right-click pop-up menu: linked fields still need a linked database and a link reference field and merged-in fields from the Linked field mapping still need to be set up in the Fields list as well.. Fill out or check the appropriate parameter properties as you would for database fields. P1 for example, is a checkbox, so its Data type must be Logical (Boolean). If tag 2R (executor) is a plain field (which is the default case), you could consider setting the Type option on the Default values properties tab to User name if you’d like the Executor entry field to contain the (overwritable) user login name as soon as the Change locations window is opened, if the executor of the physical move is likely to be the same person who registers the move. If the executor is always one and the same person, you could set the Type property to Value instead and enter his or her name in the Text list underneath it. 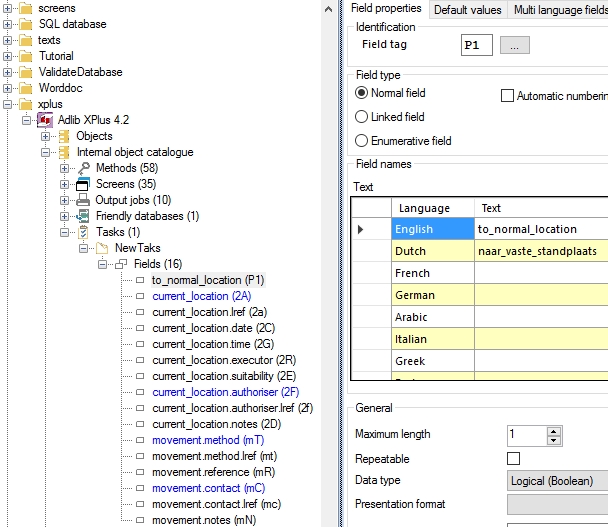 |
| 6. | To copy your new task to another data source, simply right-click the relevant task and select Copy in the pop-up menu. Then right-click the other data source and select Paste in the pop-up menu. |
| 7. | Save your changes to the .pbk after you've specified all parameters for this task. Then recycle the application pool for Axiell Collections so that the application definition can be reloaded. |
The current change locations functionality still has the shortcoming that users won't get any warnings about errors or skipped records, neither will any log be created, so a manual check of the processed records afterwards may be required.
Note that even though tasks are not supported in Adlib for Windows, setting up a task in a .pbk breaks backward compatibility with Adlib 7.4 or older.
General comments on the tasks functionality
| • | A task screen doesn't necessarily need to have fields on it. Since the screen will still contain an OK and Cancel button, you can use it as a confirmation dialog for the user, before actually starting the bulk operation. You can just place a label on the screen or specify a screen title containing your message. If the task screen contains no fields, you don't need to provide a PARAMETERS FACS declaration in your adapl: after all, there is no data to transfer from the task screen to the adapl. |
| • | The &I and &B[1] reserved variables for ADAPL works as expected: if you execute a task on multiple marked records, &I will contain the sequential number of the currently processed record, while &B[1] will contain the total number of marked records. So if you'd like to execute some code only for the first processed record you could enclose it in if (&I=1) {/*code} and code to be executed for the last processed record could be enclosed in if (&I=&B[1]) {/*code}. |
| • | In the adapl, data which you write to fields of an opened FACS database will persist in the FACS buffer as long as records are being processed and the relevant FACS database isn't opened again. That way you can collect data from all marked records and only do something with it during the processing of the last record. |
Example task using &I, &B[1] and FACS buffer persistence
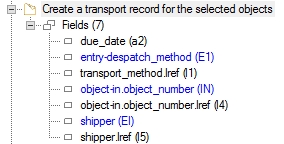
Say you want to create a task for the Internal object catalogue which links all marked records to a new transport record, then the following .pbk task parameters list definition, task screen and adapl would suffice:
* The following tags will be written to the new Transport record
fdstart TRANSPORT '../data+transpor>transport'
%0 is TRANS_priref
G7 is TRANS_despatch_or_entry
EA is TRANS_expected_entry_date
E1 is TRANS_entry_method
l1 is TRANS_entry_method_lref
E9 is TRANS_reason
IN is TRANS_linked_object
l4 is TRANS_linked_object_lref
EI is TRANS_shipper
l5 is TRANS_shipper_lref
fdend
fdstart PARAMETERS ''
a2 is PARAMETERS_due_date
E1 is PARAMETERS_entry_method
l1 is PARAMETERS_entry_method_lref
IN is PARAMETERS_linked_object
l4 is PARAMETERS_linked_object_lref
EI is PARAMETERS_shipper
l5 is PARAMETERS_shipper_lref
fdend
* Do only if the Due date field on the task screen has been filled in
if (PARAMETERS_due_date <> '') {
if (&I = 1) {
/* open the FACS db only once, for the first processed object record.
open TRANSPORT noreset
if &E {
errorm 'Error opening database TRANSPORT, code = '+ &E
end
}
}
/* Do for every processed object record: write the record number of the
/* marked object records to occurrences of the linked reference tag of the
/* linked object field in the TRANSPORT FACS buffer.
TRANS_linked_object_lref[&I] = %0
if (&I = &B[1]) { /* do only for last processed object record
/* fill transport record
TRANS_despatch_or_entry = 'ENTRY'
TRANS_expected_entry_date = PARAMETERS_due_date
TRANS_entry_method_lref = PARAMETERS_entry_method_lref
TRANS_reason = 'PURCHASE'
TRANS_shipper_lref = PARAMETERS_shipper_lref
/* Write the contents of the TRANSPORT FACS buffer to a new
/* Transport database record.
write TRANSPORT next
if (&E){
errorm 'Error writing transport record ' + %0 + '. Error: ' + &E
}
}
}
end
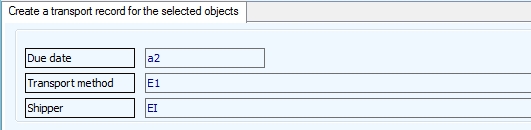
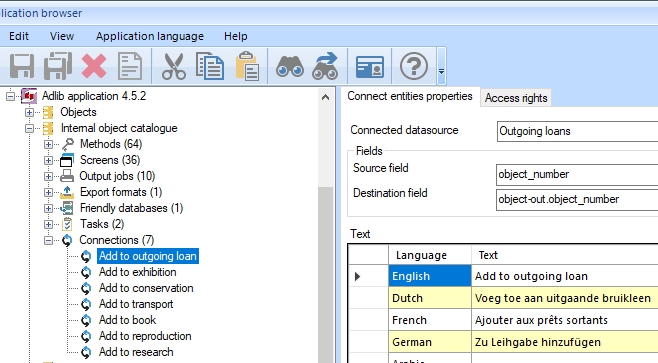
In essence, a connect entity is a user-friendly way to take a field value from marked records in one data source and copy that to another field in marked records from a second search result (or to a new record) in another data source. The most likely implementation of this principle will be bulk linking, where the user links all marked records in the current data source to a record in another data source, to link a set of objects to an outgoing loan or an exhibition for example. This functionality is available in Axiell Collections only.
Once set up properly, a Links drop-down list in the context toolbar of the Result set will offer one or more options. Prior to selecting one of the options, the user must mark the desired records for the operation. Then a Links option must be selected and activated by clicking the chain icon next to the drop-down list. A Search <data source> window will open, allowing the user to search for a second batch of records or to create a new record in the other data source to link the initial selection of records to.
The setup is constructed in such a way that it doesn't matter which of the source and destination fields is a linked field, it is even possible to set plain fields for both the source and destination field.
Depending on the nature of the source and destination field, a connect entity can behave in two different ways:
| • | If the source field is a plain field while the destination field is a linked field or plain, then the value from the source field will be copied to the destination field (and will be resolved if it concerns a linked field) |
| • | If the source field is a linked field while the destination field is a plain field, then the value from the destination field will be copied to the source field and will be resolved. |
Proceed as follows to set up one or more connect entities in a data source:
| 1. | Right-click the data source (or the Connections list header underneath it, if present) and choose New > Connect entity in the pop-up menu. |
| 2. | Select the other data source for this connection in the Connected data source drop-down list. |
| 3. | In the Source field property, click the ... button to select a field in the current database: you can pick a plain field or a linked field. In the screenshot above, object_number is a plain field. |
| 4. | In the Destination field property, click the ... button to select a field in the other database: if you picked a linked field as the Source field, then pick a plain field as the Destination field; if you picked a plain field as the Source field, then it doesn't matter if you pick a plain or linked field as the Destination field (as long as it serves your purpose). In the screenshot above, the object-out.object_number field is a linked field. |
| 5. | Add appropriate label translations in the Text box. These labels will appear in the Links drop-down list in the Result set context toolbar of the data source in which you created this connect entity. |
| 6. | Save your changes and recycle the Axiell Collections application pool. |
7.5 introduces the new internal link type Pseudonym. In a relation of this type you can associate proper names (aka "main" names) with pseudonyms. This allows you to register e.g. the proper name of an author as well as his or her pseudonym(s) in the Persons and institutions data source and link these names to each other in a way that doesn't prefer one name over the other.
The Standard and Advanced search in Axiell Collections allow the use of a new pseudonym operator when you search Persons and institutions or when you search a field in another database, linking to Persons and institutions. When you are searching using pseudonym, you search on the proper name and all its pseudonyms as specified in the Pseudonym entry field (in Persons and institutions), provided these names have the same domain (name type) as the linked field you are searching. It doesn't matter if the name you enter is a proper name or pseudonym and it also doesn't matter if the search key actually does appear in records for the search to succeed on the other names in the pseudonym relation. For example:
author.name pseudonym "Kopland, Rutger"
In this example all records would be retrieved in which the author name is either the search key itself or the proper name or any pseudonym of the search key.
In Adlib for Windows on the other hand, this is implemented in a more limited way: mark the Use relations checkbox before a search to expand your search on a name to its pseudonyms (the other way around isn't implemented and the pseudonym operator isn't available).
Pseudonyms can be entered in Persons and institutions records once relevant fields and internal links have been added to the database structure and screens. When your application is ready for it and you've actually registered pseudonyms and you try to validate field data linking to Persons and institutions, you may encounter the following icons in the first column of the list on the View table tab of the Find data for the field window:
![]()
![]()
A grey star indicates a proper name while an open star indicates a pseudonym. Pseudonyms can be registered in linked fields just like proper names: there won't be any automatic substitution of names.
As mentioned, you need to set up pseudonym fields first, before you can register pseudonyms. Proceed as follows:
| 1. | In the people.inf database structure, create two linked fields pseudonym and pseudonym_for with accompanying link reference fields. The relevant properties of the two linked fields are: Maximum length 255 (as long as the Name field); Repeatable marked for pseudonym, deselected for pseudonym_for); Linked database folder . and Database =, Lookup field name and use accompanying link reference field, No domain, Strict validation, Link only first occurrence and Allow the creation of new linked records should be marked; Relation fields Preferred field use, Equivalent field equivalent_name, Broader field part_of, Narrower field parts, Related field relationship, Pseudonym For field pseudonym_for, Pseudonym field pseudonym; Link screen ../screens/lnkaddr, Zoom screen ../screens/zm_organ, Zoom/edit screen ../screens/zm_organ; Linked field mapping Source field name and Destination field pseudonym (if that is the current field) or pseudonym_for if that is the current field. |
| 2. | Create integer indexes for both link reference fields and reindex them (to create the relevant SQL tables). |
| 3. | Add an internal link to the people.inf, with the following properties: |
| 4. | Now you need to set the relation fields for pseudonym and pseudonym_for for all fields in other databases linking to the people database. Luckily you won't have to do that manually, but still there's some work involved: just start at the top of the database list in the tree view in the Application browser and click the Fields list header of a database structure to open the fields list in the right window pane; in there, click the Linked database column header once or twice to sort the list so that all fields linking to people are grouped; select all these linked fields by clicking the first field and then Shift-clicking the last field; right-click this field selection and choose Set relation fields in the pop-up menu to set all available relation fields automatically. Do this for every database except for people.inf.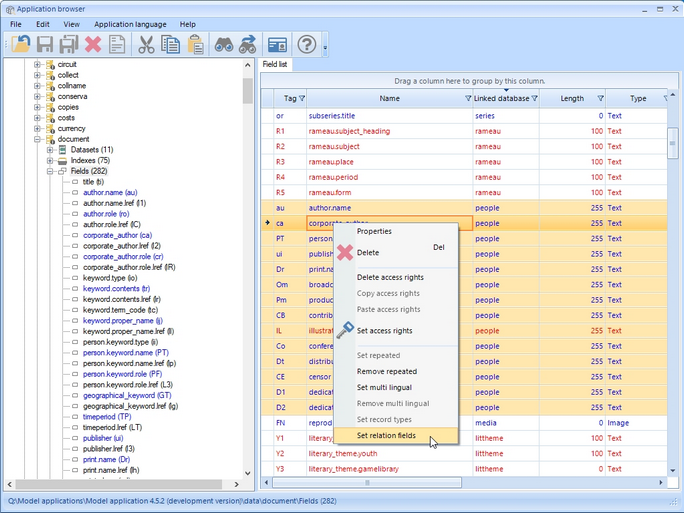 |
| 5. | Edit the name.fmt screen and add the pseudonym fields, Pseudonym is a repeated field, Pseudonym for is not repeatable.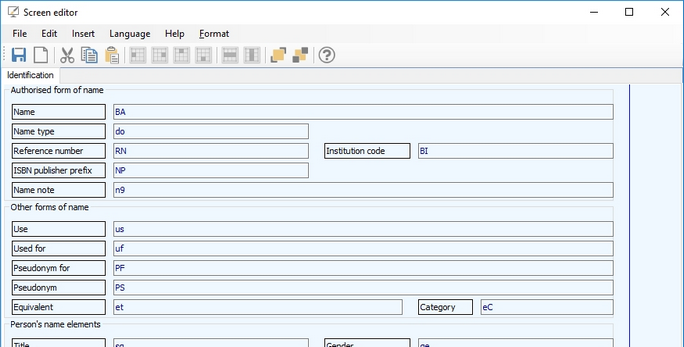 |
| 6. | Save all your changes and recycle the Axiell Collections application pool. |
A format string for reverse relations
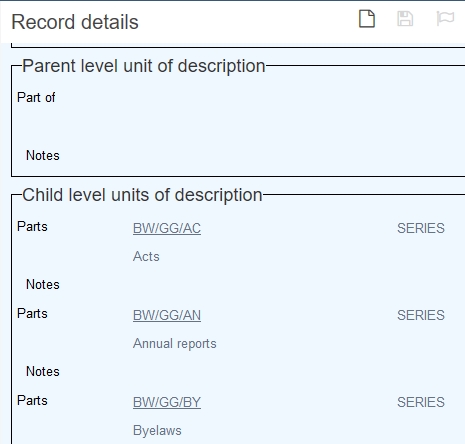
The Related records view in Axiell Collections can provide an alternate overview of all linked records in one or more linked fields, grouped per linked data source, while in the linked data source it can provide an overview of all records in the first mentioned data source linking to the current record.
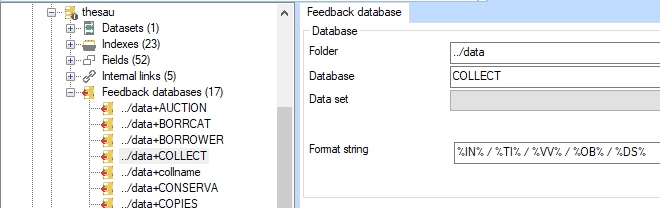
Previously when you set up a relation for this view, you could set up a Relation format string for forward relations, but no format string for reverse relations. This has has been corrected in Axiell Collections 1.0.6456.8217. Now the Format string for the feedback database (if present) in the linked database is used not only to control which fields will be displayed per record from the relevant feedback database in link overviews in Adlib for Windows, but also in the Related records view in Axiell Collections for the reverse relation of single-sided linked fields in databases linking to the current database: if a feedback database format string is missing, the format string for reverse relations of such linked fields will automatically be constructed by Axiell Collections using the fields from a relevant brief display screen. See the screenshot below for an example. The fields in the Format string are fields from the feedback database.
By default, the Gallery view in Axiell Collections displays the current record number underneath an image. However, you may set up a format string per image field in the data dictionary to display some other record data instead.
Simply enter a format string of your choice in the Format string option on the Image properties tab of an image field. Below you can see the string %IN% / %VV% / %OB% / %TI% entered in the Format string property of tag FN in Collect.
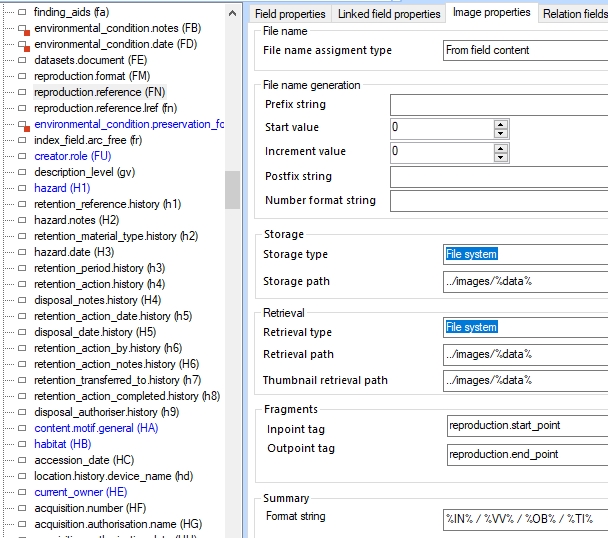
The format string may consist of fixed texts, spaces and field tags in between percent characters. By default the first occurrence will be used.
Other examples of image format strings are:
Title: %TI%
%IN% (obj.no)
%OB% %IN%
When the string to be displayed is longer than three lines, the third line will be cut off with suspension points (…).
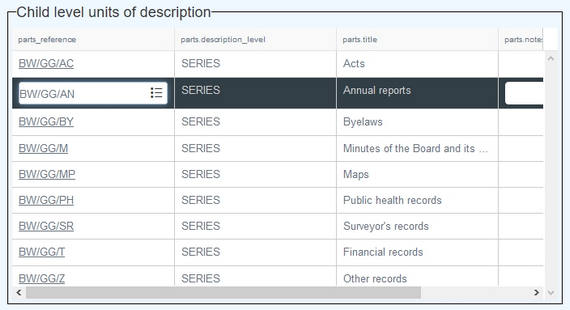
New grid view for Adlib folders
The Application browser of Axiell Designer 7.5 presents an extra Files tab for selected folders, basically a grid view showing the internal name, modification date and file name of adapl (.ada/.bin), screen (.fmt), application structure (.pbk) or database structure (.inf) files. This grid view allows for filtering and better sorting of all files in the folder to quickly find the file you are looking for. Double-clicking a file either opens the file or leads you to the file in the tree view on the left. The view is particularly useful for folders containing lots of items, such as the \adapls or \screens folder. Items in red indicate items for which access rights have been set.

Screen table (grid) views for faster performance
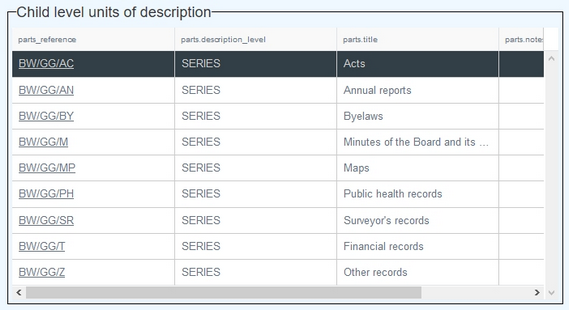
In Axiell Collections, opening a record with many linked records can take a while: normally, all links have to be resolved (meaning that the data is retrieved from the relevant linked records) before the record can be displayed and/or edited in the Record details view. If this is the case in your application, this is usually only a problem because of one or two linked fields that often have dozens or even hundreds of occurrences, like the Parts field group on the Context (ISAD) screen tab of archive catalogue records, for example.
Now there is a way though to open such records for display and editing much faster. It requires a change to the relevant screen (which will change the appearance of the entire box enclosing the fields into a so-called screen table view). The result will look as follows in display and edit mode, similar to the Result set view:
Proceed as follows to implement this:
| 1. | Open the relevant screen in the Screen editor, right-click an empty spot in the box that you'd like to turn into a screen table view, select Properties in the pop-up menu and mark the Edit link group on demand checkbox. Close the properties. The height of this table view on the screen in Collections is determined by the height of the currently edited box. So it you'd like it to be higher than it currently is, then repeatedly use the Insert > Empty line option for the bottom fields in the current box to increase the box height, after which you only have to move the selected fields and labels up again. Then save the screen. Note that the entire box is turned into a table view and this works best if the box contains but a single field group. You can check this in the data dictionary (the .inf in which the fields have been defined). In the current example that is the case indeed, but if this doesn't apply to the box you are editing because it has two or more field groups or extra loose fields, you may consider creating a new box and cut and paste the other field group or fields (that usually don't get a lot of occurrences) into it, leaving the screen table view only for the field group that really needs it. |
| 2. | The table view column headers display the user-friendly label texts from the screen fields or the field name from the .inf if the screen field has no label. To get the column header for a screen field without label to display a user-friendly text we must slightly change the definition of such fields in the data dictionary. Open the relevant field definition (tag nt in collect.inf in our example) in the Application browser. Open the User interface texts tab, check that the Screen texts are still empty (otherwise you can skip this field) and fill in the desired user-friendly field name translations that must be used as the column header label for the current field.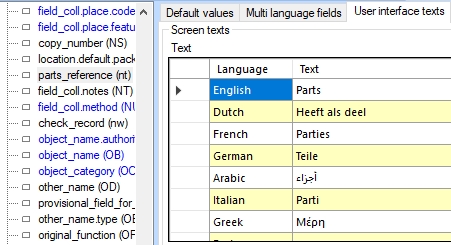 |
| 3. | Save your changes to the .inf, recycle your Collections application pool and view the results. |
Syntax
number = VALUECOUNT(database,dataset,tag,value)
Arguments
number: integer
tag: field tag
database, dataset, value: text
Meaning
Returns the number of appearances of value in the term indexed tag in dataset in database. In other words: if you'd like to know how often some value already appears in a certain tag in a dataset, you can use the valuecount function (available from adlwin.exe 7.5.17233.3 and Axiell Collections version 1.0.20170821.3 ) which is faster than the workaround using a FACS READ. There's no need for a FACS declaration for database, when you use valuecount.
Example
if (&4[2] = 'IN') { /* 'Object number'
if (valuecount('collect','fullcatalogue',IN,IN) > 0) {
errorm 'The object number already appears in the database.'
}
}
Result
Suppose your object number index in non-unique, so you allow object numbers to appear multiple times in the database but you would like users to be notified when they enter an object number that already exists. You could write an after-field adapl for the object number field (tag IN) with the code above. It first checks if the user currently leaves the object number field and then it checks if the value entered in the field already appears in tag IN in any of the stored records in the fullcatalogue dataset of Collect. If so, the warning is displayed.