Release notes 7.3

Contents
Below you'll find a brief overview of new functionality implemented in Axiell Designer 7.3, including links to more information. For some notes on compatibility issues see the Axiell Designer compatibility topic.
Any new Designer settings typically pertain to adlwin.exe-based Adlib applications, unless indicated otherwise. If a setting also pertains to applications run within an Axiell Collections environment, it will be noted explicitly. Any old or new settings which do not pertain to Axiell Collections, should have no negative effect on the operation of this software.
Contents
Relationship dependency rules for internally linked record types
The Inheritable option for fields
Customizing the link overview functionality
Variability in the fixed domain for linked fields
Additional constants for conditional fields and screens
New “group” term status (neutral value 6)
Search forms with a preset search statement
Excluding screen fields from Axiell Collections applications
Alternative SMTP server settings
Making import jobs available in adlwin.exe applications
Copying a field now only changes the English field name
Alpha-numerical sorting added to methods
Insert mapping rows in import jobs
Copying multilingual field occurrences through ADAPL
New ADAPL reserved variable &1 = 28 value
Designer performs more integrity checks
The Geo location field data type
Fixed: more consistent storage of tags from merge field definitions
Fixed: a corrupted import field mapping could import in wrong tag
From Axiell Designer 7.3.15038.1, functionality is available allowing you to override some specific properties of fields per dataset of a database, giving you the possibility to specify a different field name per dataset for one and the same field tag, or to specify different access rights for the field per dataset, a different link domain, (internal) link scope, help key or different enumeration values, for example. This new functionality follows from a recent requirement for compliancy with the CEN 15907 metadata standard (as used by film archives) and the FRBR (Functional Requirements for Bibliographic Records) standard.
In Adlib, fields have always been specified for a specific Adlib database as a whole. For example: in the collect.inf database structure file, which contains all dataset, index and field definitions for museum and archive object records, you can find the field definition for object_number (tag IN), amongst others. Its field name and other properties would always apply to all datasets within that database (recall that datasets are actually just partial record ranges of the Adlib database, created to separate similar records by record type or branch). With the implementation of this new functionality this is still the case, but if you want you can now "include" one of the existing data dictionary fields in one or more dataset specifications within the database definition and override some properties with a different value which will then only apply when the field is accessed from within that particular dataset in a live Adlib application, while the original, master field properties will still apply to any other datasets in which the field has not been included or in which the field has been included indeed but has not received any new settings. The moment you actually include an existing field in a dataset, a copy of the original field definition is placed underneath the new Fields node underneath the selected dataset node in the current database definition, where you can change the available "overloadable" properties as you wish. Note that greyed out properties can never be overridden.
To include an existing field in a dataset, do the following:
| 1. | Right-click the desired dataset of a database in the Application browser tree view and select Include field in the pop-up menu.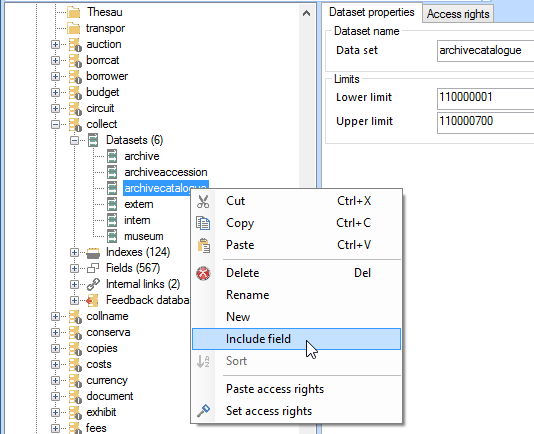 |
| 2. | Now select an existing field from the data dictionary of the current database. Note that on dataset level you cannot create new fields: you must always "include" an existing field. 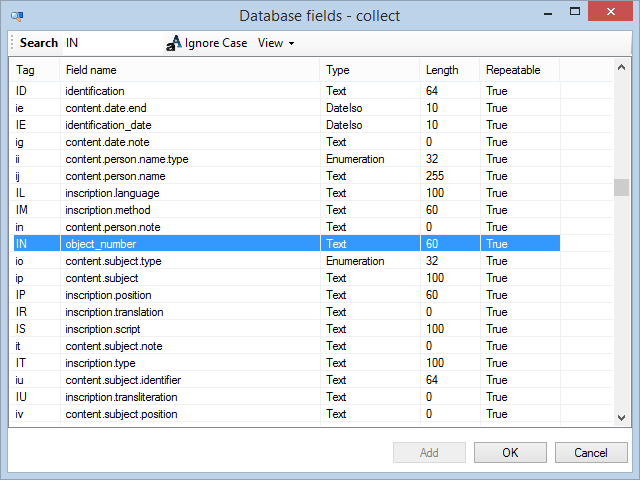 |
| 3. | A copy of the field has now been included in the relevant dataset. Select the field underneath the dataset to change any of the available properties. The new properties will only be valid in this dataset, they won't be copied to the database definition of the field nor to other copies of the field. Even though the dataset level field definition starts of as a copy and the field tag must remain the same, it'll live its own life from now on. Changes to the field on database level won't affect any copies in datasets. The exception to the rule maybe, is when you delete a field definition: when you do that on dataset level, the original database level version will remain as is, while if you delete a field definition on database level then that will be removed along with any of its derived field definitions in the datasets. In the screenshot below you can see how the IN tag (the object_number field) has been included in the archivecatalogue dataset of collect and how its field name and translations have been changed afterwards.  With this particular change you could now use the reference_code field to search the Archives (catalogue) dataset in your live Adlib application, instead of the object_number field. Other changes to the properties of included fields on dataset level may have a deeper impact or may instead be hardly noticeable to the user. 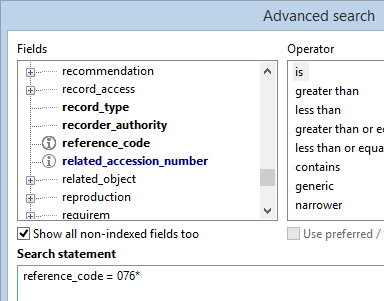 |
The Record type field is a new concept in Adlib. It pertains to a term indexed field of your choice that will indicate per record what "type" it is. This type will have to be selected by the user creating the record from a drop-down list. In Adlib there already exist two other ways of discriminating between record types: you can use datasets, to separate "book" record types from "articles" and "serials" in a library catalogue for example, or domains in an authority database like a thesaurus to be able to specify exactly in which catalogue fields a term is allowed to be used. The new Record type field on the other hand, is meant to be used in situations where different catalogue record types must really all be part of one and the same data source, for instance because it concerns a hierarchical data source like an archive in which the different record types must be linked hierarchically. In combination with other new functionality (see further down in these release notes), identifying such a field allows you to specify so-called relationship dependency rules controlling how different record types can be linked. (In the near future more functionality relying on the record type field will become available.) In itself, having a record type field does nothing: it has no consequences and merely offers the possibility to implement other functionality which relies on a record type field.
As an example, suppose you have a film archive catalogue which contains four record types which can be linked hierarchically in some way: WORK (e.g. a story or script for example), MANIFESTATION (e.g. a movie or a theatre play), ITEM (e.g. a film reel, dvd), VARIANT (maybe a black and white version of the movie). Because of the hierarchical links you couldn't have separated these records by means of datasets. Instead you can define a simple enumerative field to set each record to one of these four types. This will of course already allow you to search on record type and/or to show or hide conditional screens and fields dependent on the current record type, but after you specify the enumerative field as the Record type field for the database too it also allows you to implement other functionality like relationship dependency rules to determine if a WORK can only be linked to a MANIFESTATION or to an ITEM as well, and if a VARIANT must always be a child of an ITEM or can it also be a parent of a MANIFESTATION, etc.
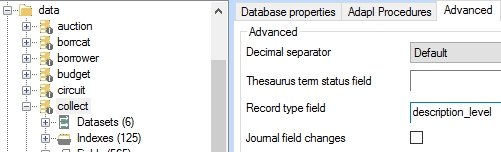
A Record type field can be set up on the Advanced properties tab of a selected database definition in the Application browser. Simply look up the desired, existing field in the current database by clicking the button with the ellipsis to the right of the entry box or type the desired tag or field name. If the field name or tag turns red, you've entered an illegal tag or field name. Fields which can be used as the record type field, must be enumerative and must have been indexed with the (index) Key type option set to Text. A second recommendation is that you make sure that when a user starts editing a new record, a default value is already present in the field or that entering a value into this field manually is really one of the first things the user has to do. The reason is that you'll likely be using the record type field contents to determine which (conditional) screens or fields will be displayed to the user next and/or to which other record types this record is allowed to link.
Relationship dependency rules for internally linked record types
The first new functionality to use the Record type field (see paragraph above) is the relationship dependency rules functionality for hierarchical internal links. If you have a hierarchical database with different record types, you can now specify per hierarchical internal link definition which relations between the different record types are allowed. You can do this by interactively putting together the allowed hierarchy, in the Relationship dependency rules box on the Internal links properties tab of the desired hierarchical internal link. (You can specify different rules for other hierarchical internal link definitions, if you want, but it's never mandatory to specify rules since the hierarchical type of the internal link relation already implies standard rules.) Here's how to proceed:
| 1. | First make sure you have selected a Record type field on the Advanced properties tab of the current database definition. Once you have, the Record type drop-down list in the Relationship dependency rules box will actually contain all possible value types from the enumerative field.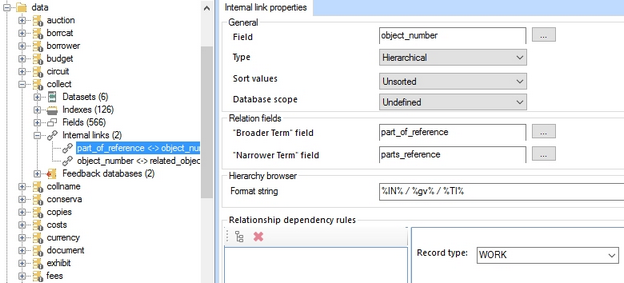 |
| 2. | The interface bit to build your relationship model is a bit unusual: just leave the Record type selection as it is (WORK in our example) when you build the model. You may click the Add node icon to insert a node in the box on the left. As long as you don't select any node in the model, newly added nodes will be added at root level, while once you select any node in the model, a newly added node will be inserted underneath the selected node (one hierarchical level down).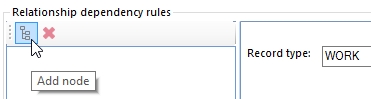 Suppose you'd like to build the model as can be seen in the screenshot below, then proceed as follows after adding the first WORK node: select the top WORK node and click Add node; select the top WORK node again and click Add node; select the third WORK node and click Add node; select the fourth WORK node and click Add node. Now subsequently select the third node and set the Record type to MANIFESTATION, select the fourth node and make it an ITEM after which you select the last WORK node and change it to VARIANT. 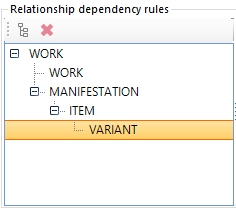 If you make a mistake you can always delete a node by selecting it and clicking the Delete node icon (the red cross). If you select a node that has narrowers, deletion will delete that node plus its narrowers. |
In effect, the model hierarchy you specify here defines which direct parent and which direct children any record of the listed type is allowed to have. So a WORK record in our example can parent other WORK records and MANIFESTATION records, but not ITEM or VARIANT records, while it can be a child of another WORK record (e.g. if a WORK is part of a series of WORKs). A MANIFESTATION record can only be parented by a WORK record and can only have ITEM children. And so on. Note that the model in itself only demands that if you create a relation between two record types, it must comply to this model: it doesn't require you to actually create relations at all.
In Adlib, after you've created hierarchical links in an edited record, the legality of the links will only be checked when you try to save the record: if a created link doesn't comply to the model, the record won't be saved and you'll receive an error message (RECORD_TYPE_NOT_ALLOWED = 378). The Adlib API doesn't perform this check yet.
Adlib also takes your relationship rules into account when you are about to create child records in batch for a selected parent record from within the Hierarchy browser: you can only add children of the record type(s) allowed by your model hierarchy. Please see the Adlib 7.3 release notes for more information about the Add child records functionality.
The Inheritable option for fields
From Designer 7.3.15216.1, you'll find the new Inheritable checkbox at the bottom of the Field properties tab for a data dictionary field. In Adlib, this option allows you to automatically display and possibly copy data from this exact field from the first record higher in the hierarchy in which this field has actually been filled in.
An example might clarify things: suppose you have an object record for a "dollhouse" which has Parts (child records) describing the contents of the dollhouse. And maybe some of those parts, like a "closet (miniature)", may even have Parts of their own. If you are registering such hierarchies regularly and you find you often need to copy the contents of some field from the top record of the hierarchy to its child records (or just be able to see its contents) - e.g. a description that applies to all parts, like condition notes about the dollhouse and its parts or some other notes relevant to all children - then a mechanism for copying that content might come in handy. And that is just what the Inheritable option is for. Once you set it for a field, say the (Condition) Notes field in the collect database, every time you view or edit an object record, Adlib will automatically look upwards in the hierarchy (if present) to see if the parent record has data in that Notes field. If not, Adlib will check the grandparent (if present) and so on, until a record with a filled (Condition) Notes field has been found. If so, Adlib will display that contents greyed out in the (Condition) Notes field of the current record, if the field was still empty. Even though the copied content is displayed in the record, it is not yet part of the current record. To save the copied contents, put the record in edit mode and simply double-click the relevant field (the Notes field in our example) or put the cursor in the field and start typing new text and/or delete copied text to fully activate the field contents (the text colour changes to normal). Now saving the record includes the activated field contents: a quick way to (partially) copy data from other records! Remember that typing new text in such fields is possible as well, so you're not stuck with the copied text.
You can set this up for as many fields as you like, and they can be of any data type except for linked fields. Per field, the user can always choose whether to activate the copied contents or not. If the user doesn't want to duplicate data from the higher records at all, he'll probably never activate the data and will just enjoy the fact that data from parent records is conveniently visible in the edited record.
Do observe that inherited data may come from different elders: one field might display data from the direct parent record, while for another field the direct parent doesn't have any information while its grandparent does. You can see the effect in the example below: note that instead of actual terms, codes, sources and notes, like you would normally use and see, abstract descriptions have been stored in these records to show you where the inherited contents in this example come from.
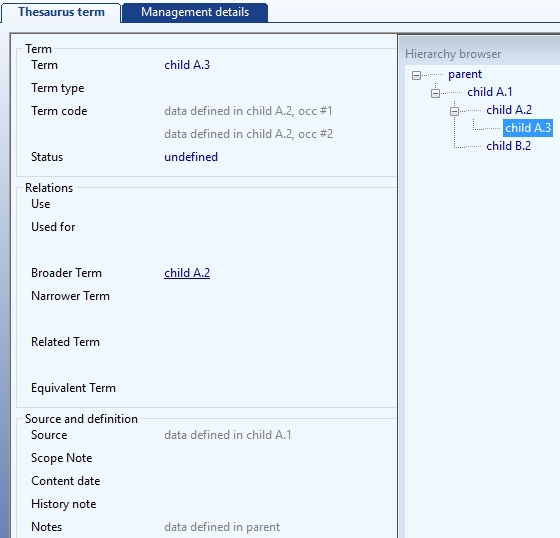
Which fields make up the parent-child relations, has been specified in the internal link definition of type Hierarchical in your database structure definition (.inf file).
In the Application browser there's also a quick way to find fields which have been made inheritable: in the tree view in the left window pane, click the Fields node underneath the desired database definition to display the complete Field list in the window pane on the right. Scroll to the right to find the new inheritable column. Fields which have been made inheritable are marked yes in this column.
A note on backwards compatibility: once you set this option for a field and save the relevant database definition, you can no longer edit this application in a version of Designer older than 7.3.15232.2, plus you can only run this application using Adlib 7.3.15232.2 or higher!
Customizing the link overview functionality
The new link overview functionality in adlwin.exe offers a special display showing from which databases and fields the current record (often an authority term or name) is referenced. (Please see the Adlib 7.3 release notes for more information about its user interface.)
This functionality works without any extra set up if feedback databases have been specified (which is the case for model applications 3.6 and higher): the Link overview button in the View menu in Adlib becomes active for the currently displayed record if for the current database feedback databases have been specified.
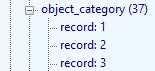
By default, the Link overview only displays the number of the record in the other database, which references the current record, like below for example, which indicates that the object_category field in records 1, 2, 3 (amongst 34 others) of the listed feedback database has a link to the currently displayed record.
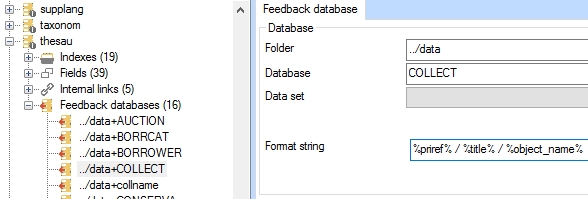
However, per feedback database definition you can change which information will be displayed per record. Per feedback database you just need to specify the desired Format string* (similar to how this can be done for the Hierarchy browser). So instead of "record: #" you could choose to display the record number, followed by the title of the record and the first registered object name - all fields separated by forward slashes - for the COLLECT feedback database, for instance. To do so for the thesaurus, for example, in the Application browser simply select the ../data+COLLECT feedback database underneath the thesau database structure definition in your \data folder and enter your Format string of choice.
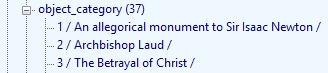
Opening the same Link overview in Adlib now shows more useful information per record (even though these records coincidentally do not have an object name):
* A quick recap of the syntax of format strings |
%<tag><[occ]>%<fixed text>… The part between percent characters is the data part: provide the tag or field name that you want to display. If you do not enter an occurrence number, by default the first occurrence will be used. %priref% / %title% / %object_name% %OB[2]% Both the data and text parts are optional. |
Besides the possibility to have some record information in the Link overview, you can set a detail zoom screen for a linked field: this allows the user to double-click any of the listed records (for the relevant linked field) in the Link overview in order to open it for display (not editing) in a zoom screen so he or she can view much more details of the relevant record.
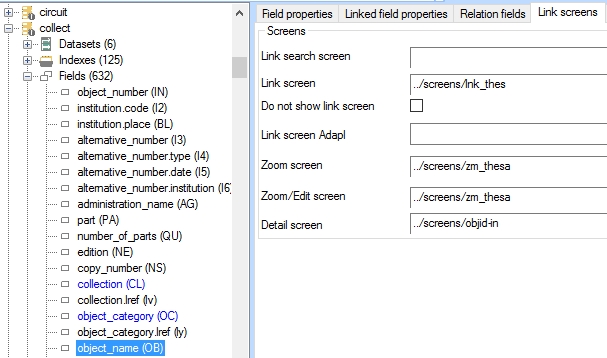
Since such a detail zoom screen will have to be set per linked field and there may be many linked fields in quite a number of feedback databases, there’s a good chance you will only implement this double-click zoom screen viewing for a limited number of fields. So first consider for which linked fields you'd like to have this functionality. For the object_name field for example, you set this up by registering an appropriate screen in the Detail screen option on the Link screens tab of the object_name properties in the collect.inf. You'll have to find or create an appropriate screen yourself, but there's probably already some existing zoom screen (starting with "zm_") that you can use, although in the example below we have found that the objid-in.fmt screen serves this purpose well too. For other linked fields in COLLECT you can use the same screen: the other databases will require a different zoom screen.
Variability in the fixed domain for linked fields
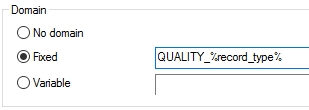
Suppose you have one or more linked fields that should be associated with their own domain which must consist partially of some fixed string (probably some string specific to the linked field) and for the other part of variable field contents which also represents a string, then from Designer 7.3 you can use a format string in the (Domain) Fixed property on the Linked field properties tab of a linked field. This format string may contain zero or more strings and zero or more English field names in between percent characters, in any order you'd like.
Typically, you could use this functionality if records in a single dataset can be of different "types" while certain linked fields, although applying to all these types, should validate to different lists of thesaurus terms dependent on the record type.
Example: say you have a dataset which may contain records for films, audio and photos. Upon opening of a new record, the first thing to do would be to select the desired record type from a drop-down list containing film, audio and photo. Let's say the field name of this drop-down list is record_type. You may or may not have also set up some conditional screens (although this is in no way a requirement) so that dependent on the record type you select, screens with fields appropriate to the record type appear. Now suppose there are also several fields which link to the Thesaurus and must be filled in for each record type, maybe a quality field. It's likely that you'll have different terms to describe photo quality, audio quality and film quality, but if you would associate the quality field with a fixed domain, you would always have to choose from all descriptors when filling in the field and validation of the entered descriptor would also succeed if you entered a film quality descriptor in the quality field for the record type audio.
To avoid such confusion you could now store the three different types of quality descriptors in their own domain (manually in advance or automatically during editing of the object record), e.g. "QUALITY_FILM", "QUALITY_AUDIO" and "QUALITY_PHOTO" after you had set up the fixed domain for the quality field with the format string QUALITY_%record_type%. Every time you would then validate an entered term in the quality field or request a list of accepted terms in the Find data for the field window, Adlib would concatenate the fixed string "QUALITY_" with the string value obtained from the record_type field ("FILM", "AUDIO" or "PHOTO") and consequently use the resulting domain ("QUALITY_FILM", "QUALITY_AUDIO" or "QUALITY_PHOTO") for searching or forcing the thesaurus term.
In principle you can use any type of field(s) in the format string. Of enumerative fields, the neutral value will be used (which is case-sensitive).
Note that as long as the field used in the format string hasn't been filled in in the record you are editing, Adlib can only assume any fixed string in there constitutes the whole domain name (which may not exist as a separate domain). Try to avoid this situation from occurring (by using conditional screens for example).
Additional constants for conditional fields and screens
For conditional screens and fields, two new constants (system variables) to be used in the expression for the condition, are available from Adlib 7.2.15079.2, namely:
| • | $datasource, contains the name of the current database (equal to the name of its .inf file); |
| • | $dataset, contains the name of the current dataset as specified in the relevant .inf file. |
For more information about this topic, see Conditional screens and fields.
Also, conditional fields can now be used on brief display screens as well.
New “group” term status (neutral value 6)
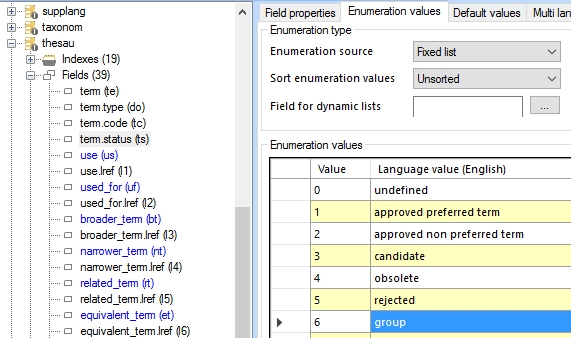
From version 7.3, Adlib supports a new term status that has the neutral value 6 and display value group. The group status is intended for terms which are useful or important in your thesaurus management to distinguish term collections and which themselves can be part of the term hierarchy but are not allowed to be used as a term in catalogue records. (Please see the Adlib 7.3 release notes for more information about its use.)
You must add the new status to the field definition of the enumerative status field in your authority database before the Adlib user will actually be able to assign the new status via the Status drop-down list in an authority record. For the term.status (tag ts) field in the thesaurus, for example, you simply add the value 6 to the Enumeration values list of the field in Axiell Designer while next to it you provide the display values in the desired interface languages, e.g. group as the English display value and groep as the Dutch translation. Remember to save your changes to the database definition.
Search forms with a preset search statement
As you may know, Adlib offers three ways to put together a search query: via the Search wizard, via a Search form (aka Query by form) in the Start menu or via the Advanced search. In a Search form you’ll enter search keys in one or more fields, with which Adlib will create a (combined) search statement in the background.
From Adlib 7.3 – you don’t need a new version of Designer – Adlib is able to add a hidden, partial search statement (which you have set up on the search form earlier) to the search statement which has been put together implicitly by the user via the relevant search form. This has the advantage that search forms can be created for a specific use. In the Query by form Archives in the Archive (catalogue) data source for example, you could set up a partial search statement to make sure that the search form is always used to search on the item description level. In the Query by form Object in the Internal object catalogue on the other hand, you could specify the condition that the form will only search for objects on a certain location or after a certain historical acquisition date, for example.
The partial search statement must be set in the properties of a search form which you have opened in the Designer Screen editor, on the List fields tab. At the top of the Tag list, enter the new AddToQuery parameter. Next to it, as the English Text value, enter the desired partial search statement: that search statement is of the Advanced search type but should always start with a Boolean operator (AND or AND NOT, the other operators aren’t very useful) because in the end Adlib must be able to create a combined search statement of it.
Example:
| 1. | In an XPlus model application 4.2 there’s a Query by form Collection available in the Internal object catalogue data source. Let’s add a fixed search statement to that search form. |
| 2. | In the Designer Application browser, open your application structure and beneath it the Internal object catalogue. Then open the Methods list > Query by form Collection > Screens and double-click Query by form Objects to open the screen in the Screen editor. |
| 3. | Right-click an empty spot in the opened search form and choose Properties in the pop-up menu which opens. Then on the List fields tab, underneath Tag, fill in the AddToQuery parameter and type your search statement behind English in the list on the right. Of fields, provide the tag or the English field name. Enter for example: and current_location = Amsterdam. 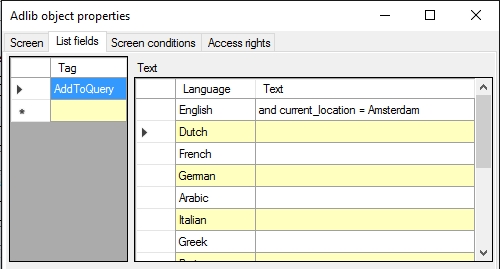 |
| 4. | Close the properties window, save the changes to the screen, restart Adlib en observe the consequences when you perform a search in Adlib, using the relevant search form. Suppose you’re searching for Object name: painting, then Adlib will really search on: object_name = painting and current_location = Amsterdam. |
If the user doesn’t enter any values, the search will proceed with the fixed search statement only. In this example that would be: (and) current_location = Amsterdam.
Excluding screen fields from Axiell Collections applications
Axiell Collections is a hosted database management web application. In short, it allows you to search your databases, view, add or edit records and print selected data. Compared to Windows Adlib applications, the big difference is that Axiell Collections opens in your web browser instead of in its own Windows application window. See the Axiell Web Help for all documentation about its user interface or see the demo application at http://collections.axiell.com/ for a hands-on experience (you may request demo login details through our helpdesk).
Even though Collections is marketed and sold under the Axiell brand name, an Axiell Collections application uses Adlib application, screen and database structure definitions (.pbk, .fmt and .inf files) like it were a regular Adlib application (which indeed makes it easy to run Axiell Collections next to your Windows Adlib applications).
In principle, every setting you make in an application, screen or database structure definition, will have effect in both the Adlib and the Axiell Collections user interfaces, unless the functionality it represents has not been implemented in Axiell Collections yet. From Designer 7.3 though, you'll gradually see options being introduced which distinguish between Adlib and Axiell Collections user interfaces.
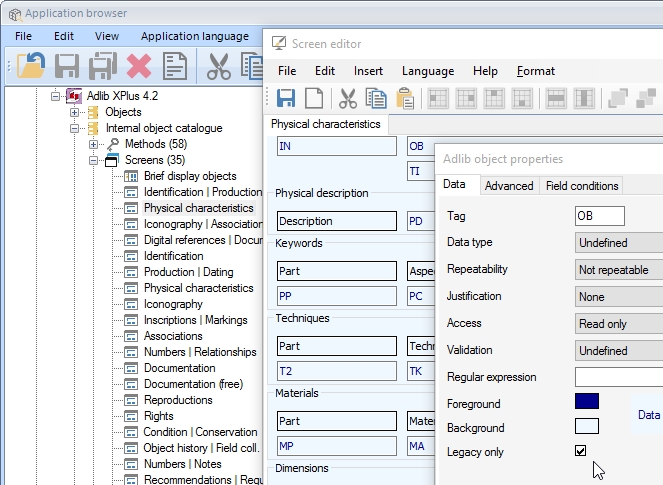
The first of these options is called Legacy only, a screen field setting: right-click a field, label or box on a screen, select Properties in the pop-up menu and on the Data tab of the Screen object properties you'll see the new option at the bottom. Mark the Legacy only checkbox to prevent this screen field, label or box from showing up when Axiell Collections displays the current screen. (For display in your legacy Adlib application it doesn't matter whether you mark the checkbox or not.) This allows you to present the same screen with a more or less limited set of fields in Axiell Collections. A typical use would be to exclude the read-only fields at the top of most Adlib screens from displaying in Axiell Collections.
The Legacy only setting reuses an obsolete option for screens, which makes it backwards compatible with adlwin.exe 7.2. Note that backwards compatibility is only a consideration if you actually mark the checkbox for some screen field; if you never use it, backwards compatibility is never an issue.
The pop-up menu which opens after right-clicking a folder node in the tree view of the Application browser now also contains the new Open in file explorer option. Select this option to open the relevant folder in a Windows Explorer window so that you can see and/or edit all content from that folder directly.
The pop-up menu which opens after right-clicking an adlib.pbk or adcirc.pbk node in the tree view of the Application browser now also contains the new Run application option. Select this option to directly start the relevant application using adlwin.exe or adloan.exe: the appropriate executable will be selected for you automatically. This is a quick way to test any changes you've applied to your application.
Axiell Designer will look for these executables in an \executables folder at the same level as the current application folder: in ..\executables. If that folder doesn't exist, then any folder set in the Windows PATH environment variable will be searched for the executables. (Windows environment variables can be set or adjusted through the Windows Control Panel; changes only become active after logging on to Windows again.)
New enumerative list items can now be inserted anywhere in the list, from the right-click pop-up menu: the new row will be inserted right above the currently selected row.
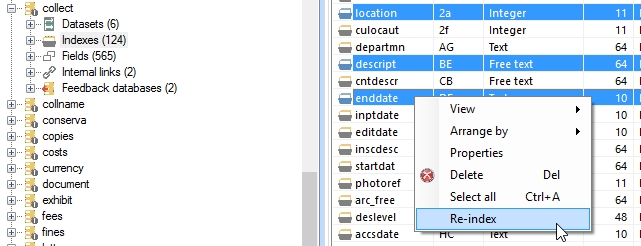
You can now reindex multiple selected indexes at once. In the tree view, first click the Indexes list header to open the index list grid view in the window pane on the right. Then select multiple indexes by Ctrl+clicking or Shift+clicking the desired indexes. Now right-click one of the selected indexes and choose the Re-index option in the pop-up menu. In the Reindexing indexes for <database> window you'll still have to click Start to actually start reindexing.
Another new pop-up menu option is Collapse items. This option is active in the right-click pop-up menu for any node in the Application browser tree view which has been expanded. Previously, when you had opened many branches of the tree view and wanted to get back to the clean overview with no expanded branches, you had to click all header nodes separately: it wasn't enough to collapse the main folder node because when you reopened it, you would see all expanded branches again. This behaviour hasn't changed, but the new right-click pop-up menu option Collapse items does not only collapse a node, the main folder for example, but all nodes underneath it as well. Now, after expanding the relevant node again, the nodes underneath it will all be displayed in their collapsed state (without expanded branches).

Alternative SMTP server settings
To send e-mail from within Adlib through an SMTP server you've always had to set the ADLIB_SMARTHOST Windows environment variable to the name of the SMTP server. You would set this variable temporarily in an adapl to be able to send e-mail from within the adapl or you could set the variable permanently via the Windows Control panel, per workstation. A general, permanent sender e-mail address would normally be set in the ADLIB_FROMADDRESS environment variable or in adlib#.txt files. (See the SDI and e-mail from Adlib manual for more information about this.)
This functionality has not changed and will still work as expected if you do not implement the new, alternative way to apply SMTP server settings. This alternative is available from Designer 7.3 and is intended specifically for the case in which the SMTP server requires user authentication and/or needs to be accessed on a different port than the default one (port number 25).
The alternative settings can be edited in Axiell Designer and will be stored in its own AdlibSmartHost.xml file which will look similar to the following:
<?xml version="1.0" encoding="utf-8"?>
<adlibSmartHost xmlns:xsi="http://www.w3.org/2001/XMLSchema-instance"
xmlns:xsd="http://www.w3.org/2001/XMLSchema">
<server>smtp.ourmuseum.com:30</server>
<userName>ourmuseum\erik</userName>
<password>a51bebcec3809890fdjhk09290a2c6c</password>
</adlibSmartHost>
Since the <password> node contains an automatically generated, encrypted version of the actual password, you'll have to create and edit this file in Axiell Designer:
| 1. | From within the Application browser you can add a new Adlib Smarthost configuration file to any folder, by right-clicking the folder in the tree view and selecting New > Adlib Smarthost in the pop-up menu. When sending e-mail from Adlib for Windows or by means of SDI, version 7.3.15114.2 or higher, the software will search for the AdlibSmartHost.xml file in the current application folder and in the \executables folder, so create your AdlibSmartHost.xml file in the appropriate folder. If Adlib can't find the file in these folders, it will revert to the old Adlib smarthost mechanism.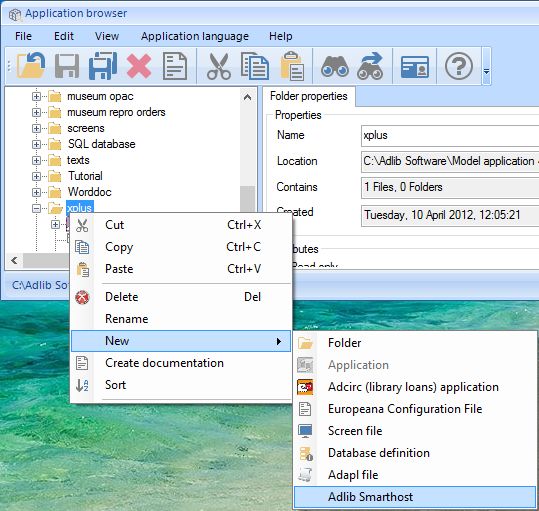 |
| 2. | You can edit three properties of the SMTP server configuration: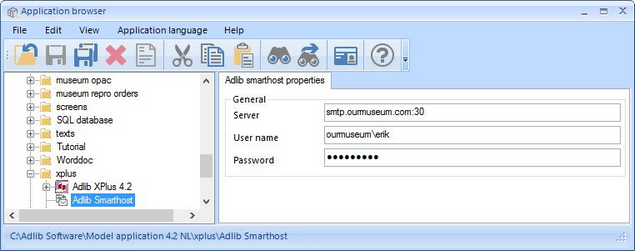 |
| o | Server: the name and port of the SMTP server. The port number is optional. If provided, if must be separated from the server name by a colon. If no port number is specified, the default port number 25 will implicitly be used. |
| o | User name (optional): this is the user name, possibly preceded by a network domain, that will be used to create the authenticated connection to the SMTP server. From within Adlib you can only send e-mail via the authenticated SMTP server if you've logged on to Windows under the same name as specified here. Also, if you provide a user name, you must also provide a password. |
| o | Password (optional): enter the Active Directory password with which this user logs on to Windows. After you've saved the AdlibSmartHost.xml file, in the file the password will have been converted to an encrypted version, using 128 bit AES encryption, so your password is safe. |
| 3. | Save the AdlibSmartHost.xml file when you're done editing. |
Making import jobs available in adlwin.exe applications
From 7.3 there's a really easy way to make import jobs available for execution from within the Import wizard in your adlwin.exe application. The only thing you need to do is place the import job in the relevant Adlib application folder, e.g. \xplus or \library, and of course make sure that all path settings in the import job point to the proper locations for the database and adapls and such (but that's no different than usual). Also enter a short Description in the import job: this will then be used as the job title in the adlwin application (otherwise the full path and file name of the import job will be displayed).
Now when you start the relevant adlwin.exe application, the import job will only appear in the Import wizard after you've opened the data source for which the import job is intended. For example: if the (Destination) Database option in the import job has been set to COLLECT while the Dataset option has been set to intern, then the import job will only become visible in the Import wizard if you open that wizard from within the Internal object catalogue.
After selecting your import job in the Import wizard and clicking Next, the following page of the Import wizard opens, showing only some of the options of the import job, which you can change if you like, for example to select a new exchange file. The options you change won't be saved in the import job.
Copying a field now only changes the English field name
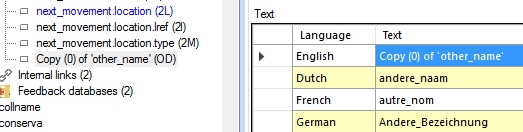
After copying and pasting a field definition from and to the same database, in the Application browser, only the English field name will now be changed to Copy (n) of '<original field name>', the other translations won't be changed any more. The idea is that when you decide to copy a field, you'll want the copy to be practically the same as the original, usually with just a slight change to the name. Because you'll want to remove the Copy (n) of ' and closing quote parts anyway, it's more convenient if you just have to do that with the English name, instead of with all translations (as was the case previously).
Alpha-numerical sorting added to methods
To the Key type options for Sorting, on the Method properties tab of a selected method in the Application browser, the Alpha-Numeric type has been added to allow you to automatically sort this method's search result alpha-numerically on the sort field you set for it.
In the Sorting option group, you can set the sort criteria that Adlib must use to determine the order of the records as presented on brief display screens, but you only need to set this option if the default sorting, as determined by the Key type of the index searched by this access point, is not what you want.
These sorting options are only editable if the current method is an access point. You should specify a sort field (of the Text data type) to sort alpha-numerically on. If you do not specify sort criteria, Adlib will sort the retrieved records ascending on the currently searched field, according to the key type of its index.
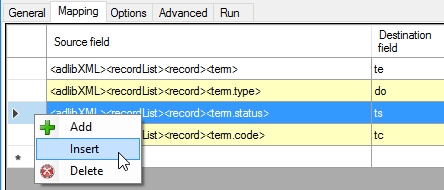
Inserting mapping rows in import jobs
When creating a mapping for an import job, you can now insert a new row anywhere in the mapping (instead of just adding a new row at the bottom). This is handy when you are extending a long mapping which you'd like to keep in a certain order. In the mapping, select the row above which the new row must be inserted, right-click the selected row and choose Insert in the pop-up menu.
Copying multilingual field occurrences through ADAPL
From version 7.3.16014.4, ADAPL offers the COPYDATA function for multilingual fields: it copies all language values from a specified occurrence of a database tag (or FACS tag alias) to another specified occurrence of the same or a different database tag (or FACS tag alias). The function was required because for multilingual fields, a simple tag assignment like OB[1] = OB[3] doesn't work. You always had to specify the language code to copy its value, like: te[1, 'en-US'] = te[4, 'en-US'] and repeat this for any other language values contained in the field.
The new function comes in handy if you just want to copy the entire multilingual contents of a multilingual field occurrence, without having to know what exactly is contained within. The syntax is as follows:
Syntax
COPYDATA(source_tag, source_occurrence, destination_tag, destination_occurrence)
Arguments
source_tag, destination_tag: database variable (a field tag or FACS field alias)
source_occurrence, destination_occurrence: integer
Meaning
COPYDATA copies the entire contents (including language attributes) from source_tag[source_occurrence] to destination_tag[destination_occurrence]. If the source field is multilingual, the destination field must be multilingual too. For copying unilingual fields you don't need this function: use a simple tag1[occurrence] = tag2[occurrence] assignment instead.
Example 1
copydata(YB, 2, VV, 10)
Result
YB[2] will be overwritten with the entire content of VV[10]. VV[10] will remain unchanged.
Example 2
integer i, j
text tagvar[2], tagvar2[2]
i = 1
j = 5
tagvar = 'do'
tagvar2 = 'do'
copydata(!tagvar, i, !tagvar2, j)
Result
Tag indirection works as well. Tag occurrence do[1] will be overwritten with the entire contents of do[5].
New ADAPL reserved variable &1 = 28 value
From Adlib 7.3.15076.1, an adapl set up for a database as a Field based procedure (aka after-field adapl) which is called after input of a field (when leaving a field in edit mode, irrespective of whether the contents of the field have been changed), will now be executed two or three times if the field is a linked field. The first time it is executed &1 will be equal to 21 (as it has always been), while the second and possibly third time it will be equal to 28.
So why will it now be executed two or three times? Typically, when you want to have an after-field adapl executed for a linked field, you'd like it to be executed after the link has been resolved, that is: after the proper preferred term has been entered or selected from the Find data for the field window and the accompanying number of the relevant linked record has been resolved into the link reference field for the linked field, because only then you'll have the data you need for your after-field code. Unfortunately, it is possible to leave a linked field and thereby initiate the (first time) execution of the after-field adapl before the link has actually been resolved: this happens when you enter a non-preferred or preferred term in a linked field and leave the field by pressing the Tab key, for example. The attempt to resolve the term you typed into the linked field will only take place after the after-field adapl has been run.
This problem has now been solved by automatically running the after-field adapl again after any attempt to resolve the actual link: this occurs either after typing a preferred term in the linked field and leaving the field, after typing a partial or non-preferred term in the linked field and leaving the field, after copying a preferred term from the Find data for the field window or after leaving an empty/emptied linked field. This means the adapl will run twice in any of the following situations:
| • | after typing a preferred term in the linked field and leaving the field; |
| • | after leaving an empty/emptied linked field; |
| • | when you type any term in the linked field and do not leave it, but open the Find data for the field window using the Shift+F4 shortcut or menu, select a preferred term and click OK. |
On the other hand, the adapl will run three times:
| • | when you type a partial or non-preferred term in the linked field, leave the field (which initiates adapl run 1 and 2), after which the Find data for the field window will be opened automatically for you to select a preferred term and click OK (which initiates adapl run 3); see below for an example of this situation. |
For backwards compatibility, the first run still has to be done too. And to distinguish the two events, the second and third run get a new execution value: 28.
Together with the occurrence of &1=28, four other existing reserved variables receive values which you can use in conditions in your after-field code, namely the following:
| • | &1[2]=1 means a link has been established and resolved successfully. &1[2]=0 means that either the linked field has been left empty successfully or that something went wrong during resolving (e.g. you entered an unknown or non-preferred term): use &1[3] to find out more. |
| • | &1[3] results in an Adlib error code if &1[2]=0: this error code will be 0 (no error) if the linked field has been left empty successfully, while it will be greater than zero if an error occurred during resolving (for instance because no linked record matched the entered term). &1[3] will also be equal to 0 when &1[2]=1 (no error during resolving). |
| • | &4[2] will contain the tag of the linked field that you are leaving. |
| • | &4[3] will contain the number (as text) of the current occurrence of the linked field that you are leaving. |
Even though previously an after-field procedure was only executed once, in our model applications the ADAPL code for this specific event has always been conditionally wrapped in an if (&1=21) {...} statement, so typically you needn't be worried that any after-field code meant to run only once will now be run two or three times and cause problems. You should use &1 = 28 primarily in new and/or additional code to create a more robust handling of after-field procedures for linked fields than was possible before.
Example:
Let's say you've associated an after-field adapl with a linked field and in a record in edit mode you proceed as follows:
| 1. | Put the cursor in the linked field. |
| 2. | Type a partial or non-preferred term and press the Tab key to move the cursor to the next field. The after-field adapl is being run for the first time while resolving of the link has not been attempted yet: &1=21. No linked data is available yet. |
| 3. | An attempt at resolving of the link takes place. The after-field adapl is being run for the second time and &1=28. Since the attempt will fail, &1[2]=0 and &1[3]=7 (record not found). |
| 4. | The Find data for the field window opens automatically. Select a preferred term and click OK. A new attempt at resolving of the link takes place. This initiates adapl run 3 and again &1=28. If the attempt succeeds (which it should), then &1[2]=1 and &1[3]=0. Linked data is available now, so the adapl can finally do something useful. |
| 5. | The selected preferred term has been copied to the linked field, the link has been resolved and the cursor has been moved to the next field. |
Designer performs more integrity checks
When you open the \data folder of your application in Designer 7.3 you might see some automatic changes being logged in the main window of Designer, monolingual linked fields which have been made multilingual for you, for example, because the field they link to is multilingual. It is recommended you accept such automatic changes and save them.
When you save changes in your database structures, Designer will now also perform a variety of integrity checks to reduce the chance of structural errors. You'll be warned by Designer if any errors need to be resolved before you can save your files.
The Geo location field data type
On the Field properties tab of field definitions in the data dictionary you'll encounter a new Data type called Geo location. In Axiell Collections, a field with this data type will show an extra Geographical map tab in de the Find data for the field window (if the geo location field is a linked field) allowing for an easier validation of geographical names by means of an actual map. A geo location field will also appear in the Geographical map view as one of the fields which the user may select to mark the places stored in that field on the geographical map. In normal (adlwin.exe) Adlib applications, setting the data type of a field to Geo location will have no effect.
The intention is not to create any new fields with this data type but to change the data type of one or more existing fields (linked or not) that contain geographical names, (mostly from data type Text) to Geo location if you'd like those fields to have the validation by geographical map (if it concerns a linked field) and if you want those fields to be selectable in the Geographical map view of Axiell Collections.
An example would be the production.place field in the collect.inf database structure. If you make it a geo location field by changing its field definition (no other settings required), the Geographical map view in Axiell Collections allows the user to show the production places of a selection of records as coloured markers on a geographical map which can be zoomed in or out and scrolled in all directions.
Note that the different geographical maps implementations in Axiell Collections are currently (April 1, 2016) still a work in progress.
Fixed: more consistent storage of tags from merge field definitions
In a Linked field mapping, where you specify which fields to merge in with the current linked field, you'll always see field names, not fields tags, and that's how it will stay.
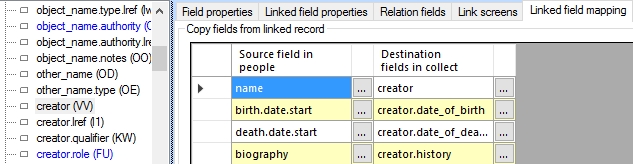
In the background however, it's actually not the field names that are stored in the .inf file (the Adlib database structure definition) but their tags. Unfortunately it sometimes occurred that this translation failed and a field name instead of its tag was stored. This caused a problem when the particular mapping was processed because all stored items were and are considered tags and of any stored field names simply the first two letters were taken to be a tag, which resulted in a wrong mapping.
To make sure that any hidden corruption in existing .infs becomes exposed and is easily fixed, Designer will now check every loaded .inf (when it is opened in the Application browser) for this corruption and will repair it automatically by replacing stored field names by their tags. If this happens, a log of these changes will be displayed in the main Designer window.
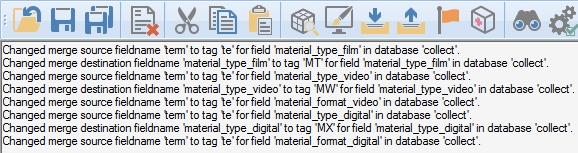
All you have to do is save these changes in the relevant .infs before you close Designer.
Fixed: a hidden corruption in an import field mapping could cause data to be imported in wrong tag
If the field mapping of an import job accidentally contained a target field name without being associated with an actual tag in the data dictionary, the relevant data would get imported into a tag consisting of the first two letters of that field name. In the best case, that tag would be an undefined tag so that the data would be stored but not be present on a screen anywhere. A worse case would be if the created tag was an existing tag, so that the imported data would not only end up in the wrong tag but could possibly overwrite existing data in that tag as well. These issues have been fixed in Designer 7.3. (Ref.no: 5582)