Release notes 7.8

Contents
Below you'll find a brief overview of new functionality implemented in Axiell Designer 7.8.#, including links to more information.
Backwards compatibility
Using new (Collections-only) Designer settings in your application and database definitions will always break compatibility with older versions of Designer and Collections and other Axiell software* using the same BaseAPI, although removing those new settings will often restore that compatibility under the condition that the SQL table structures haven't changed because of those settings: if the SQL table structures have changed too, then a SQL database backup from before that change is required as well to go back to the previous state. The Designer release notes always note the compatible version of Designer and Collections, but this applies to below list of other Axiell software too. For a full list of compatibility issues through the different versions of Designer and Collections, see the Axiell Designer compatibility topic. The Axiell software which needs to be updated to the latest version once new Designer settings have been applied (only if you have a license for that software of course) is the following: Collections, AdMove server, Workflow client, Ingest, WebAPI, SDK, AnalyzeData, Migration, ConvertInternalLinks, IndexCheck, InternalLinkCheck, LinkRefCheck, RemoveLanguageFromData, RemoveTagsFromData, DBtool and ValidateDatabase.
New options and functions for Axiell Collections make further use of Adlib for Windows impossible
New settings in Axiell Designer pertain only to applications run within an Axiell Collections environment. If such new settings are applied, then the resulting application can no longer (reliably) be opened in Adlib for Windows. Since development of Adlib for Windows has ceased quite a long time ago, these new options are not supported by Adlib for Windows. Even if Adlib would ignore the relevant option, you could no longer reliably work in Adlib too, so altered applications using Collections-only functionality should never be opened in Adlib again.
Contents
Create missing tables function for incomplete SQL databases
Logging options for Collections login and bulk operations
New &1 execution code 33 for tasks
Logging changes made in Designer
Autonumbering functionality extended
Writing a new Word document to a URL
2022-07-14: release notes Axiell Designer 7.8
The following bug fixes for Designer 7.8 and new functionality for Axiell Collections version 1.14 have been implemented:
Bug report no. |
Short problem description |
AX-365 |
The Application browser produced an unhandled exception when creating a copy of a task (or field) within the same data source. |
AX-363 |
Application browser: dragging Task nodes to change the order within the Tasks wrapper node was not possible. |
AX-359 |
The Application browser's adapl compiler returned an error 172 on a certain FACS-referenced .inf. |
AX-350 |
There was an error Unable to load DLL when compiling an adapl in Designer. |
AX-349 |
The Decimal separator option (set to Comma) for .inf's was ignored by Collections. |
AX-344 |
The Application browser would freeze when compiling an adapl with a FACS reference to a non-existing database file. |
AX-343 |
Reindexing an index with a domain name tag only indexed the last domain value from each record, while all domains from the record and the value without domain should have been indexed. |
AX-340 |
Marking the Inheritable option in the properties of a non-grouped field, had no effect when saving the .inf: the checkbox was automatically deselected again as soon as you navigated to another field and went back to the field that had just been changed to inheritable. |
AX-330 |
A NullReferenceException was thrown when copying a linked field to a Task field list. |
AX-322 |
Entries on the Record types tab for field definitions in the .inf were not saved. |
AX-296 |
Designer could crash after starting an import job because AxiellDesigner.exe had no proper signed certificate. |
AX-277 |
The Object searcher didn't find Inpoint/Outpoint tags. |
AX-118 |
The Object searcher didn't find roles in task definitions. |
AX-117 |
The Object searcher didn't find task menu texts. |
AX-116 |
The Object searcher didn't find task screens. |
AX-115 |
The Object searcher didn't find task adapls. |
2022-07-14: create missing tables function for incomplete SQL databases
When you run Designer in administrator mode* - do that by right-clicking AxiellDesigner.exe in Windows Explorer and then select Run as administrator in the pop-up menu - the right-click pop-up menu for the \data folder or a selected .inf in the Application browser, has a new Create missing tables function. If tables are missing from the SQL database for whatever reason (if accidentally deleted, if new indexes were not reindexed or if a new table structure was not fully processed for example), then use this option and Designer will check the SQL tables against all the .inf's and their index definitions and will add (and reindex) any missing tables.
* You do not have access to network shares when you run Designer in administrator mode, so the Designer folder has to be on the same server or computer as your Axiell application.
2022-06-23: logging options for Collections login and bulk operations
Collections 1.14 has the option to log details about bulk operations performed by users and the login of users. The relevant bulk operations are importing, exporting, printing, running tasks and find-and-replace procedures (also when available operations are executed by the Axiell background scheduler service running on Collection 1.14 or higher). Administrators can use the logged information to find out who performed which bulk operation when and/or when users have logged in.
The logging only works for Axiell model applications 5.0b and up, because earlier versions do not have the required database and data source in their application. However, if you have an older application version, you can implement the new database in your existing application quite easily and still benefit from the logging functionality in Collections 1.14 and up. A package containing the relevant application files and instructions on how to implement them in your own application is available for download here.
Once your application is ready to store and present log records, you'll still have to switch on the logging functionality in Designer 7.8. This can only be done by running Designer in administrator mode: you do that by right-clicking AxiellDesigner.exe in Windows Explorer and then select Run as administrator in the pop-up menu. You do not have access to network shares this way, so the Designer folder has to be on the same server or computer as your Axiell application.
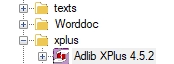
Now open the Application browser and select the application .pbk file for which you'd like to switch Collections logging on (this must be done per desired application .pbk), for example:
In the right window pane you'll then see an extra properties tab called Features, that isn't editable normally.
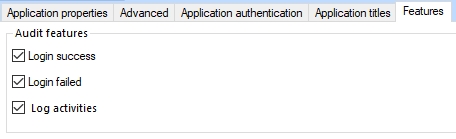
Simply mark the options which you'd like to be logged (Log activities stands for the mentioned bulk operations), save the .pbk, recycle the Collections application pool and you're done.
For advanced users: note that these settings are stored in an adlib.json file which is located in the application folder which also contains the adlib.pbk file.
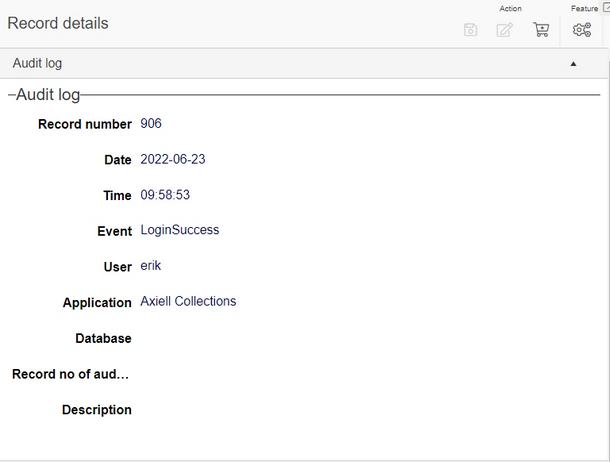
Each login and bulk operation in Collections will now result in a new record in the Activities log data source that should be present in your application now. You can look up your own login record immediately and see what it looks like. Something like this probably:
These records are read-only by default to make sure they are not changed.
A search-and-replace operation might leave a log record similar to the following:
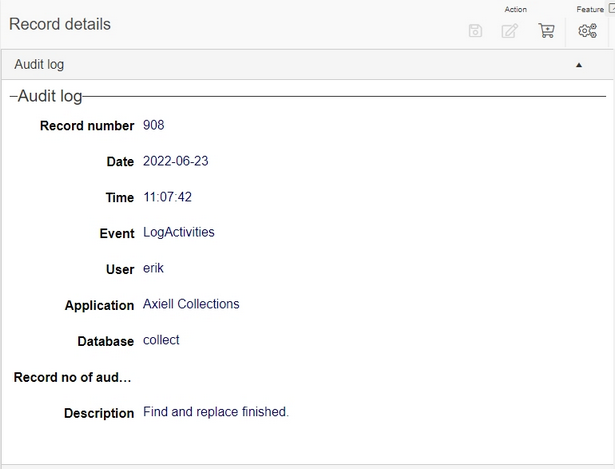
Note that the Record number of audited record field is meant for future use.
Setting up this functionality will break compatibility with older versions of Designer and Collections.
2022-06-10: new &1 execution code 33 for tasks
From Collections 1.14, a new &1 execution code 33 is now available in ADAPL when a task is being run. So with if (&1 = 33) { ... } in an adapl you can execute the code between { and } only when the adapl is executed as a task adapl.
2022-06-10: logging changes made in Designer
From Designer 7.8, you can have changes (including deleted and added properties) to elements of the adlib.pbk, .inf and .fmt configuration files logged in log files automatically, so that administrators can keep track of who changed which application property and when, or to track down the cause of errors due to some misconfiguration.
Entries in these log files will contain as much context information as possible to identify what has changed, when it was changed and who changed it. Below is an example of a log entry on a change of a role for a datasource in the application, providing the date and time of the change, the name of the user responsible, the main object, the relevant object property, the old value and the new value of the property:
12/01/2022 15:32:14|erik|application > datasource 'Catalogue' > Access|Role changed|old: archive|new: archive+library
Each log entry is written to a log file specific to the modified configuration file when that file is saved by Designer. There will be one change log file per modified configuration file per day, the name of the log file will include the name of the file that was changed and the current date in ISO format. So for the adlib.pbk the log file name will be something like adlib.pbk2022-01-12.log, while for collect.inf it might be collect.inf2022-06-13.log and for a screen file named access_management.fmt it might be access_management.fmt2022-06-13.log. You can open such log files in any text editor.
Logging only works if you create a specific settings.xml configuration file and place it in the folder containing AxiellDesigner.exe. Designer will check for that file on startup of Designer (and only then). Example:
<settings>
<applications>
<application>
<name>Our production application</name>
<path>C:\Axiell\model 4.5.2 Live</path>
<log enabled="true">C:\Axiell\Designerprodlogs</log>
</application>
<application>
<name>Our test application</name>
<path>C:\Axiell\model 4.5.2 Test</path>
<log enabled="true">C:\Axiell\Designertestlogs</log>
</application>
<application>
<name>Our development application</name>
<path>S:\Axiell\model 4.5.2 Dev</path>
<log enabled="true">C:\Axiell\Designerdevlogs</log>
</application>
</applications>
</settings>
Here's how to best use this functionality:
| 1. | First decide IF you want changes made in Designer to be logged at all. The advantage can be that any application configuration errors that pop up after changes were made, can possibly be traced more easily using the Designer logs. A disadvantage might be that the logs provide a false sense of security because logging can be switched off easily by removing the settings.xml file temporarily or by using a Designer instance without that file. Placing Designer in a safe location which can only be accessed by selected application managers can remedy that, of course. |
| 2. | If logging is desirable, choose which Axiell environments to log. You'll maybe have a development, test and/or live/production environment. At first one may think that logging modifications in the live environment is enough, but you're better off logging the configuration changes in all your environments. This is because you may copy configuration files from environment to another at one point and also because when something goes wrong in your test or development environment, those logs come in handy too. |
| 3. | This logging functionality works from Designer version 7.8. An instance of Designer will log changes to configuration files if a proper settings.xml file is located in the folder that also contains AxiellDesigner.exe. This needs to be the case for every instance (copy) of Designer that you have and you shouldn't use copies of versions older than 7.8 once you start logging because older versions can't do the logging and a 7.8 (or higher) version of Designer won't do the logging without that file either. If you have instances of Designer on different servers, check that the paths in a copied settings.xml file are still accessible from those servers: UNC paths are not supported, but mapped drives and of course local paths are. The path of the root application folder opened in Designer should be identical to the path registered in the settings.xml file. Also note that even if you have a separate Designer instance per environment, it's worth including all environments in each settings.xml file so that if you accidentally use the Designer instance from one environment to edit another environment, the changes will still be logged. |
| 4. | In the settings.xml you can specify one or more <application> nodes: we do not mean Collections or Axiell applications or single .pbk's here: we are more thinking of an Axiell environment. Provide each environment section with a descriptive <name>: this name doesn't point to a folder or anything and is only used in this settings.xml file to identify a section easily. In an <application> node you further specify the <path> to the shared root folder for one or more Axiell applications within an Axiell environment, typically this is the path to the folder containing the Axiell \data, \screens, \adapls and Axiell application(s) (e.g. \xplus, \library etc.) subfolders: in other words, the folder one level up from \data. UNC paths are not supported, but mapped drives and of course local paths are. Underneath the path that you select, changes in .pbk's, .inf's and .fmt's in all subfolders will be logged: changes in adapls, text files, XSLT's and Word templates however, won't be logged. Per <application> node you have to specify a <log enabled="true"> path to a folder to contain the new log files. This doesn't need to be an existing folder, it will be created by Designer automatically if it doesn't exist yet. Best choose a different logging folder for each environment in a location where you're not likely to accidentally delete them. |
2022-06-07: autonumbering functionality extended
If you mark the Automatic numbering field checkbox on the Field properties tab of a database field, an Automatic numbering properties tab will appear for you to specify how you'd like the autonumbering to be done. In Designer 7.8 (for Collections 1.14 and up), new options have been added to this tab to allow you to select and specify a new automatic numbering type based on the contents of fields selected by you.
The two types of autonumbering can be selected in the new Autonumbering type drop-down at the top of this tab:
| • | Using format string: the default and pre-existing way of autonumbering using the Assignment moment, the Automatic/Manual choice, Prefix string, Start value, Increment value, Postfix string, Number format string and Current value properties. |
| • | From field content: the new way of autonumbering using the Assignment moment, the Automatic/Manual choice, the Number format string and the new Field content options list at the bottom. The existing options have no different meaning here: the Number format string still formats the automatically incremented number (always incremented by 1 in this case), for example. However, that number is only the last part of the entire value that will be put in the field automatically. That is because you can now prefix that number with the contents of one or more fields in the edited record: simply list the desired fields from top to bottom in the order in which you'd like to have them appear in the complete compound value. So with the settings from the screenshot below for example (for an object number field in this case), a user editing a record would be allowed manual input, but if he or she would leave the field empty, then before storage, this functionality would look up any institution code in the current record, an object category and an acquisition number, calculate a new unique automatic number with up to four leading zeros (because the format string has 5 characters), paste them all together using the dash as separator between the value parts and put that value in the field. So in a particular record with an institution code AXI, an object category paintings and an acquisition number BD29377, this could result in an automatically assigned value like AXI-paintings-BD29377-00001 for a first record with automatic number. Make sure the Number format string is long enough to be able to display all future automatic numbers. For example, if you expect the number of records never to exceed 100,000, then 6 characters are plenty, while if you think that number can be exceeded, then make the format string 7 or 8 characters long for example. (If the automatic number exceeds the format string length anyway, the automatic number inserted in the record will become a string of asterisks...) 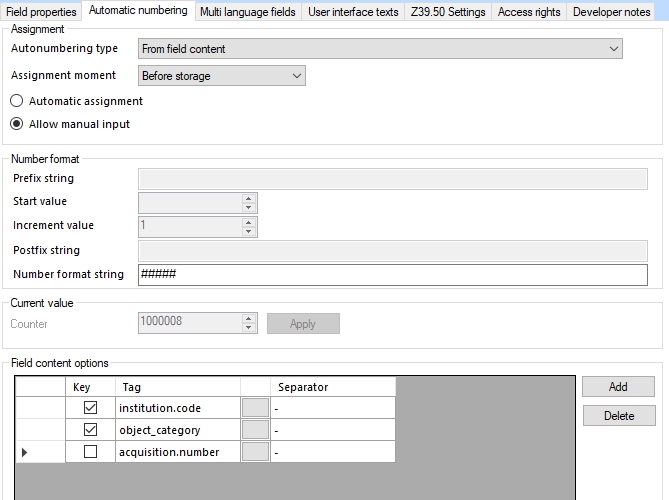 You can add a new field part in the Field content options list by clicking the Add button to the right of the list. The new row will always be inserted at the bottom, so enter the fields in the correct order. Click the grey ... button in a row to select a field of choice (although you can also type a field tag or field name yourself). Then in the Separator property enter any desired separator character(s) to separate that part of the compound value from the next. It doesn't need to be a dash and you can also leave it empty as well. Of course you can delete any row by putting the cursor in it and clicking the Delete button. You'll have noticed the checkboxes in front of the fields in this list. This is somewhat more complicated. First understand that all the fields in the list (regardless the state of those checkboxes) will end up in the compound value in the automatically numbered field in the record if those fields have been filled in. However, by marking one or more fields via their checkbox, you indicate that only the combined value from those fields will determine if the automatic numbering of the last part of the compound value should continue where it left off (if the combined value has appeared in some record before) or if it should start anew at 1 again because the combined value is new. In other words: with the settings in the screenshot above we're actually saying that every unique combination of institution code and object category will get its own counter (with the relevant combined field contents as it name) in the dbo.auto_numbering table in the SQL database and that the acquisition number is irrelevant although it will still be part of the value that is entered in the field in the record. So to continue with the AXI-paintings example: everytime a user creates a record with this institution code and object category, will the automatic numbering continue where it left off a previous time. And for a record with different values in those fields simply a new counter will be started: a first new record with institution code AXI and object category drawings for example, will get the automatic number AXI-drawings-00001 if no acquisition number has been filled in and any future record with institution code AXI and object category drawings and maybe an acquisition number DB843 that time, will get automatic number AXI-drawings-DB843-00002. So the deselected acquisition number field in this example setup is irrelevant to the counters. It was already mentioned that all the fields in the list will end up in the compound value in the automatically numbered field in the record if those fields have been filled in. But none of those fields need to have been made mandatory (on the screen or otherwise) per se. You can make one or more fields mandatory of course, if you really want users to always fill in a value in that field, but for this functionality it's not required. So that means that if none of the fields are mandatory, they can be left empty by the user. In that case only the automatic number will be filled in. All in all, this makes for very flexible autonumbering functionality. Before setting it up though, do consider carefully which values should determine the counter increment, which fields should combine into a value in the autonumbering field and which of those fields should be mandatory. Also ask yourself how users will have to search on the combined values, considering how truncated searching works in Collections and if records in a result set can be sorted on the autonumbering field in a logical and/or satisfying way: it'll possibly prevent a frustrating user experience later on. |
Implementing this functionality will break compatibility with older versions of Designer and Collections, but emptying the new options or changing them back to the default ones, restores that compatibility. Remember to update all other Axiell software to their latest version too, when setting new options.
2022-05-24: writing a new Word document to a URL
When using the ADAPL WordCreateDocument function result = WordCreateDocument (template, document_or_printer, option, tag) to create a new Word document somewhere, then previously it was not possible to use a URL as the document_or_printer argument: it always had to be a file name (possibly preceded by a path).
This has changed for Collections 1.14 and up, because now you can use a URL too. You'll have to make that explicit in the WordCreateDocument call though. The already existing option argument therefore allows a new value - 1024 - to indicate to Collections that the destination you provide in the document_or_printer argument will be a URL. See the new option value as a safety measure to make sure that the adapl really intends to store documents to a URL.
For a URL you must of course provide one which can actually handle the writing of a document, like an Axiell WebAPI call using the writecontent command. Typically this URL is available in the Storage path property of the relevant application field, since you'd probably like manually uploaded documents by the user to be posted to that URL too. That could be a URL like:
https://ourdomain.com/media-insert-api/wwwopac.ashx?command=writecontent&server=documents&value=%data% (for a non-enterprise environment)
or
https://ourdomain.com/media-insert-api/wwwopac.ashx?command=writecontent&server=documents&folderId=%priref%&value=%data% (for an enterprise environment), for example.
So better not hard-code the URL in the adapl, but merge the storage path with any document name (put together in the adapl) you like, using the ADAPL formatfield function.
So suppose you have a repeatable application field tag DC and using an adapl you'd like to fill field occurrence 3 of this field with a document name formatted like mydocument<current date>.docx. An actual Word document with that name must be created in a location indicated by the Storage path (like the example above) set for field tag DC in the .inf. If you then have an empty destination_path text variable, a docreftag text variable containing string "DC", an integer occ variable containing occurrence number 3 and a template_path text variable containing the relative path and name of a Word template to use, then you could create the actual document and fill tag DC with the document name via:
!docreftag[occ] = 'mydocument' + date$(8) + '.docx'
destination_path = formatfield (!docreftag, occ, 'default')
result = WordCreateDocument (template_path, destination_path, 1024)
2022-02-22: new Full Text index type
The new (optional) Full Text index table is available from Axiell Designer version 7.8 and Axiell Collections version 1.14 (and won't break compatibility with older versions Designer but will break compatibility with older version of Collections) and entails an additional, new SQL database table type, replacing all free text index tables, all non-unique text (term) index tables and the wordlist table by a single so-called Full Text index table per .inf file which will be named after their .inf name, in the name format dbo.<database>_fulltext, dbo.collect_fulltext for example. Uniquely indexed fields will also be indexed in the same Full Text index table for search performance improvement, but unique index tables will remain present and updated as well but these will be used only to check for uniqueness of the relevant field contents on data entry. The advantage of the single Full Text index table being that the SQL queries which are executed under the hood of Collections or the WebAPI or any other search-capable Axiell tools, will become much simpler and efficient and may therefore greatly increase search performance in the relevant indexes. For Full Text indexed databases it also allows Starts with, Contains phrase and Does not contain phrase access point searching on both Text (term) and Free text indexed fields, whereas the normal database structure only allows Contains phrase and Does not contain phrase searching on Text indexes.
Note that importing data via Designer or import.exe does not support this table structure yet (2022-07-21), only importing through Collections or Axiell Migration is supported. However, a new upcoming import tool appropriately called importtool.exe will indeed be able to import data into databases enriched with new index types like the Full Text index type and the Indexed link type. More information coming soon.
Setup of the full text index database structure
| 1. | For safety, create a backup of your current application and SQL database. |
| 2. | Make sure that no one is working in Collections and won't need to in the coming hours, because in the steps below, indexes will need to be reindexed and this can take some time, depending on your database size. |
| 3. | Check that Full Text Search has been installed/enabled on your SQL Server instance, because in a default installation that is not the case. Please see the SQL Server documentation or e.g. here for information about how to check and/or install this option. The option is available from SQL Server 2005 but the Axiell implementation only supports SQL Server 2019 and up, and is required to be installed before continuing with the following steps. (If you continue without having installed Full Text search, reindexing all indexes in a step 7 will give an error Full-Text search is not installed, or a full-text component cannot be loaded and you'll have to restart Designer, reverse the procedure, install the option still and then perform the procedure again.) |
| 4. | In the Axiell Designer Application browser, select one of the .inf's in your Axiell \data folder, the collect database structure for example and on its Database properties tab mark the Enable full text index checkbox.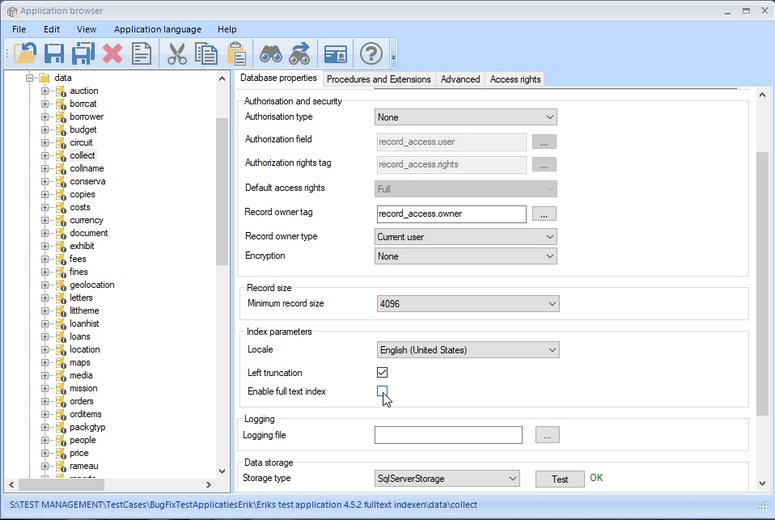 |
| 5. | As soon as the option has been selected a confirmation window opens, to have the new setting applied to all other .inf's in this folder too. This is required, so click OK.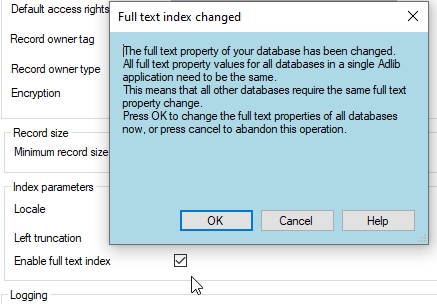 |
| 6. | Save the changes in all the .inf's. |
| 7. | Now you'll need to rebuild all indexes for all these databases to add the new index tables to your current SQL database table structure: you should currently use a special command-line tool called IndexTool.exe for this purpose, because the implementation in Designer is not optimal yet. The separate tool will rebuild the index tables very fast, even for large databases. The tool can be requested through our helpdesk. See the bottom of this topic for documentation about the tool. |
| 8. | Recycle the Collections IIS application pool. |
The index definitions for all free text and non-unique and unique indexes will and must remain present in each .inf. Reindexing one of the free text, unique or non-unique indexes in Designer will add or update the rows for the relevant field tag in the new table. Unique indexes also still have their own tables, which will be updated on reindexing as well. When you'd like to add a field to the Full Text index, just create an index for it as you would normally do and reindex it.
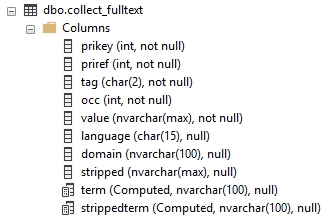
In the SQL database, each of the new tables will have the following columns:
Data in that table will look something like the following:

Note that setting this option breaks compatibility with older versions of all Axiell software (except Designer). So using the Full Text option means you'll have to update all Axiell software to the latest version.
The Full Text index structure is reversible, should you want to go back to the old structure. If all you did was mark the Enable full text index checkbox for one or all databases, then just deselect it for all databases and you're fine. If you also reindexed all databases, you'll have to deselect the option for all databases and restore the SQL backup you made earlier. If you didn't make a backup, you'll have to deselect the option for all databases and reindex all databases again (using Designer) to reconstruct the old indexes: this will take much longer than restoring a backup.
Using IndexTool.exe
IndexTool.exe is a freely available Axiell command-line tool for quickly creating full text indexes, after you've set the Enable full text index option for all .inf's in your data folder and saved that setting. Preferably place the tool files in a separate folder near SQL Server but that is not required. If the operation of the tool is aborted mid-process, it can continue where it left off at a later time (when you restart it) because it stores a continuation file in the \data folder of the Collections application so the user must have write/create file access to this folder, or this part of the program will not work. The SQL user configured in the database .inf files must have access rights to create tables and install user defined SQL types.
For safety, create a backup of your database first. Then run the tool from a command-line window and specify any of the following options as its arguments (include the dashes).
--help |
Show command line help |
--version |
Show IndexTool version number |
-p or --data-path |
Path to application \data folder. Use this option to specify the path to the Collections \data folder. The user running the tool should preferably have write access to this folder since the tool will attempt to create a file in this location (continuation.json). |
-x or --drop-index |
Drop and recreate the full text index tables (in case the created indexes need to be redone for some reason). This flag instructs the tool to drop any existing full text indexes and recreate the full text index table for every database that it is processing. Use this flag to start the indexing process from the very beginning with fresh and empty tables. |
-l or --log-path |
Enable and create log file at this path. Include the desired file name, something like mylog.txt for example. (If you specify the same file name repeatedly, then new log information will be added to the existing file.) By default (if you do not use the option), the tool will create a log file with a name formatted like indextool_<ISOdate>_<time>.log in the tool folder: it will also always print the log to the terminal window before it exits. Use the option to specify your own path and filename of the log file to which to log all tool events. You must have write/create access to that folder. 2022-06-02 18:37:46.0079 | Databases completed successfully: "collect,letters,people,settings,supplang,thesau" 2022-06-02 18:37:46.0079 | Databases skipped/empty: "auction,borrcat,borrower,budget,circuit,collname,conserva,copies,costs, currency,document,exhibit,fees,fines,littheme,loanhist,loans,location, media,orders,orditems,packgtyp,price,rameau,reprlang,reprordr,research, reserv,retention,sericopy,series,statics,stock,subscrip,taxonom,transpor" 2022-06-02 18:37:46.1743 | Wrote continuation list (42) to path "..\data\continuation.json" |
-d or --database |
Whitespace separated list of one or more databases. This option lets the user specify which databases should be included in the indexing process. Typically you want all databases to be indexed and you specify that with an asterisk (*). |
Examples:
IndexTool.exe -p "..\data" -d * -l |
Index all the databases (this is also the default if -d is not specified) and create a log file. After running the tool, check in SQL Server Management Studio that each .inf now has a full text index table: these have names like dbo.collect_fulltext, dbo.thesau_fulltext, etc. If you already had the relevant database opened in SQL Server Management Studio, you may have to use the Refresh function in there to refresh the list of tables and see the new ones. |
indextool.exe -p "..\data" -x -d * -l "..\logs\mylog.txt" |
If due to errors not all of the full text indexes have been created, you can try again and add the -x option to drop the earlier created ones and recreate all full text indexes. |
IndexTool.exe -p "C:\Axiell\data" -d collect people |
Index only collect and people |
IndexTool.exe -p "C:\Axiell\data" --database event- |
Index all databases except for the event database |
Additional Information:
The tool will automatically shut down when all processing has completed, however the tool can be interrupted at any point and shut down using the Ctrl+Q key combination. Ctrl+C will not work and has no effect.
The tool is a fully multi-threaded application and will utilize all available CPU cores, however the tool is not heavy on the CPU as most time is spent transferring data from and to the SQL server. The tool will index two databases concurrently and there is currently no way of specifying any advanced indexing settings.
The user interface is fully resizable, and the mouse cursor can be used to scroll the list of databases during the reindexing process.