Interface functionality: managing fields and indexes

Contents
When you have opened the data node of your Collections application in the Application browser (see Accessing the database setup), you can edit the properties of each object, but you can also do some object and file management in the tree view. For fields, indexes and internal links you can do the following:
Moving and copying
Parts of an application in the tree view can be moved by cutting or copying a selection and pasting it elsewhere. Right-click an object and choose Copy (Ctrl+C) or Cut (Ctrl+X) in the pop-up menu. Then select another list or folder, right-click it and choose Paste (Ctrl+V) in the pop-up menu. This way, you can copy or move a field, index or internal link to a different folder.
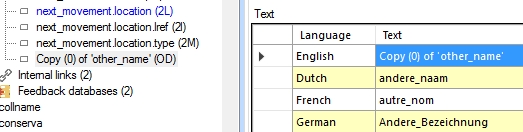
After copying and pasting a field definition from and to the same database definition, only the English field name will be changed to Copy (n) of '<original field name>': from Designer 7.3, the other translations won't be changed any more. The idea is that when you decide to copy a field, you'll want the copy to be practically the same as the original, usually with just a slight change to the name. Because you'll want to remove the Copy (n) of ' and closing quote parts anyway, it's more convenient if you just have to do that with the English name, instead of with all translations (as was the case previously).
You can also drag objects like fields or indexes from one field or index list to another (to where the mouse pointer displays a +). (Dragging means clicking an object, keeping the left mouse button pressed down, and moving the object some place else, and then releasing the mouse button.) Always drag an object to the header node of a list, to add it to that list. If you drag an object to a similar object in a list, that object will be replaced!
Dragging fields, indexes and internal links, means copying them.
The Index list view
In the Index list view, which appears in the right window pane of the Application browser when you select the Indexes list header underneath a database definition in the tree view in the left window pane, you can see an overview of the properties of all indexes.
The Fields column shows all fields (field names and tags) indexed in that particular index. Although most indexes index just a single field, some of them index multiple fields, so this column helps tracking down such indexes.
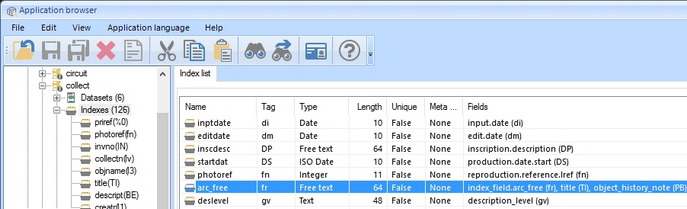
Note: if the Fields column initially appears to narrow to show all its contents, simply drag the right border of the Fields column header to the right to widen that column.
Creating an index definition for a field
There are three ways of creating a new index definition:
| • | Right-click a data dictionary field name in the tree view of an opened database definition* in the Application browser, and choose Create index from the pop-up menu (only available if the field has no index yet). The type of the field determines what kind of index is created. If you create an index for a linked field which has a forward reference tag, then the index will be created for the forward reference tag automatically (since the linked field itself does not contain data). |
| • | If you drag a field to an index list header (where the mouse pointer displays a +), automatically an index of this field will be created and built in the concerning list, where you can edit its properties immediately, if they need changing. |
| • | Right-click the Indexes list header in the tree view of an opened database definition and select New > Index in the pop-up. Then enter the properties of the new index manually. |
If you create a new index in a database definition, the table in the SQL database must still be created but you can do this by simply reindexing the relevant index: if the table doesn't exist yet, it will now be created for you.
New items can be created. In the tree structure, select the folder or the object in which you want to create a new folder or new application object, and create the object through File > New, or right-click the folder or object and choose the new object through the New option in the pop-up menu. What objects are available in the New menu depends on the node that you selected. For instance, to create a new field in a database, you must select or right-click the database name or the Fields list header. Similarly, you may create new indexes or internal links.
Important: a new index must be built up by reindexing it - the index table will be (re)filled with data - after you have set all the properties of a blanc new index. Reindexing is also necessary if the field for this index does not yet contain any data because the reindexing will create the SQL table.
Deleting objects
Select any node in the tree view (a field, an index, an internal link etc.) that you want to delete and either choose Edit > Delete, or right-click the object and choose Delete in the pop-up menu, press the Delete button on your keyboard, or click the Delete button in the toolbar:
![]()
Note that deleting any object or node that has sub-objects, also removes those sub-objects. Folders are deleted along with their contents too. Deletion of files is currently permanent: you cannot restore deleted files from Windows' recycle bin. Deleted sub-objects within the database definition (including index files, the exception to the rule), can be restored by not saving the changes in the concerning .inf file when you close Designer.
From version 7.1.0.31 of Axiell Designer, deleting an index definition means deleting the index table from the SQL database.
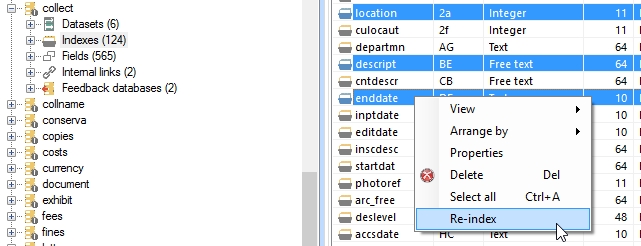
Reindexing of index tables can be done by right-clicking an individual index to be reindexed, or a database or folder in which you want to reindex all indexes that appear in it, and choosing the appropriate Reindex… option in the pop-up menu. The pop-up menu options Reindex all indexes and Reindex all databases just index/reindex all indexes (of all types) underneath the selected node. Reindex all word indexes just indexes/reindexes all indexes of the Free text type, underneath the selected node. If you reindex all word indexes from a \data folder node (and only from there) by means of the Reindex all word indexes in this folder option in the pop-up menu, the wordlist table will first be deleted, after which the reindex process will also automatically rebuild the wordlist table.
You can also select one of these objects and choose File > Reindex ... in the menu bar to obtain the same result. Moreover, there's a Re-index button available on the Index properties tab of an individual index if you just want to index or reindex that particular index.
Note that in general, reindexing forces a save of any modified .inf files before reindexing is actually started.
Also, you can run only one reindex job at a time; while reindexing you can continue other work in Axiell Designer though. Do not close Designer until a reindexing job has finished.
You may cut off a running job by clicking the Abort button in the progress window; aborting reindexing only stops the process, it doesn't restore the indexes to the state prior to reindexing. You can use this to your advantage if you're trying to create an index table for a field which you know is still empty: just start the reindexing of the field and the table will be created, then Abort the process because further indexing isn't necessary (because the table now exists and no values need to be indexed anyway).
Any reindexing errors will be reported in the main Designer window.
If you create a new index in a database definition, the table in the SQL database must always still be created but you can do this by simply reindexing the relevant index: if the table doesn't exist yet, it will now be created for you.
From Designer 7.3 you can also reindex multiple selected indexes at once. In the tree view, first click the Indexes list header to open the index list grid view in the window pane on the right. Then select multiple indexes by Ctrl+clicking or Shift+clicking the desired indexes. Now right-click one of the selected indexes and choose the Re-index option in the pop-up menu. In the Reindexing indexes for <database> window you'll still have to click Start to actually start reindexing.
See also
Managing databases and datasets