Custom Word templates uploaded through the Output formats dialog can be stored on the server automatically. The stored template will then become available (initially under its file name) in the Output formats dialog too, so next time this Word template is needed for printing, the user can pick it straight from the Output formats dialog and won’t need to upload it again.
This functionality is optional and is only activated as soon as a correctly configured reports.inf is present in the \data folder of your Collections application and the corresponding tables in the SQL database have been created. From model application 5.2 this functionality is present by default though.
To implement this in model applications older than 5.2, we have a ready-made reports.inf that you may copy to your \data folder, but you will still have to do a little work on it, using Axiell Designer:
| 1. | Download the ready-made reports.inf, two screens and a stripped down .pbk here. |
| 2. | After you’ve copied the reports.inf to your \data folder, open it in the Axiell Designer Application browser. On the Database properties tab, change the Data source name and Server properties (and possibly the User name and Password too) to match those of the other database table structures. Save the changes to the reports.inf. |
| 3. | Right-click the reports database table structure (make sure you have selected this one and not one of the other existing database structures) in the tree view on the left and choose Clear database in the pop-up menu. This will create all required SQL tables for the new database table and indexes. |
| 4. | Now open Windows Explorer and create a new sub folder somewhere in your Axiell folder to contain all future uploaded templates. In your \Worddoc sub folder you could create a new \uploadedtemplates sub folder, for example. |
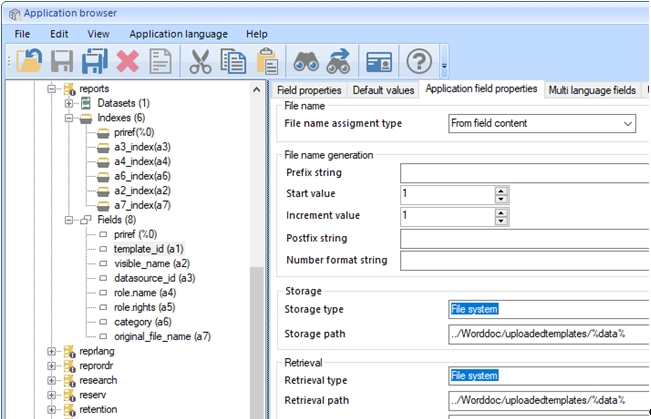
| 5. | In the Application browser, now select template_id (a1) in the fields list of reports.inf and open the Application field properties tab. Change the Storage path and Retrieval path setting to point to the new folder that you just created and extend that path with /%data%, e.g.: ../Worddoc/uploadedtemplates/%data%
Save your changes to the .inf.
 |
| 6. | Recycle the IIS application pool for Axiell Collections when nobody is working in Collections. |
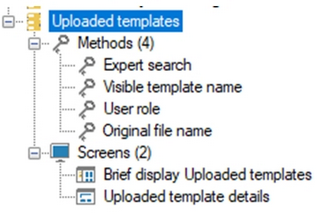
If you want you can leave it at this, but if you’d also like to be able to manage the list of uploaded templates as it appears in the Output formats dialog (change the visible titles, determine which users should have access to which uploaded templates, hide certain uploaded templates permanently), then you may also set up a data source for this database: each time a template is uploaded, Collections will create a new record for it in the reports database table so an appropriate data source in your application structure will allow access to those records. Proceed as follows:
| 7. | Copy the two screens to your \screens sub folder. |
| 8. | Copy the adlib.pbk from the zip file to a temporary sub folder directly underneath your Axiell main folder. |
| 9. | Open both the temporary sub folder with the copied .pbk and a regular application sub folder with the target .pbk (in \xplus for example) in the Application browser. In the copied .pbk, right-click the Uploaded templates data source and select Copy in the pop-up menu. Now right-click the target application structure node, e.g. Xplus 4.5.2, and select Paste in the pop-up menu to insert the copied data source into the list of existing data sources. You can still drag the pasted data source to a different place in the list. Save the changes in the target .pbk.
 |
| 10. | Now remove the temporary sub folder containing the .pbk from the zip file. |
| 11. | Recycle the application pool for Axiell Collections when nobody is working in it. |
Once users have uploaded templates during printing, the Uploaded templates data source will now allow you to manage the records associated with those uploaded templates. Users will never create new records in here manually, only edit them.
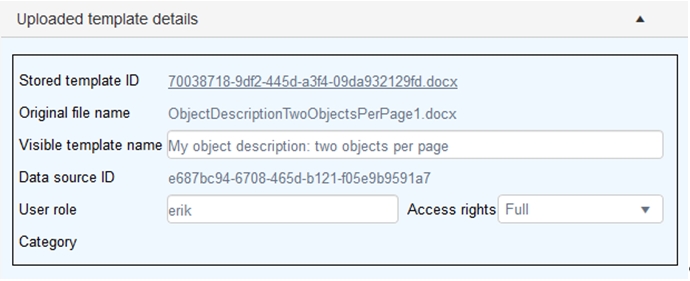
A record contains only seven fields, of which you can edit just three:
| • | Stored template ID – the uploaded template will be saved in the designated storage path under a unique ID. |
| • | Original file name – the original file name of the uploaded template will be saved in this field. |
| • | Visible template name – initially, the original file name will be stored in this field too but you can change it to anything you like. This will be the visible title of the template in the Output formats dialog. It can only be entered in a single language. |
| • | Data source ID – the template can only be visible in the data source from which it was uploaded. The name of that data source will be converted to a unique ID and saved in this field. |
| • | User role/Access rights – the user or role who uploaded the template will automatically get Full access rights. This means two things: this user or role will have Full access rights to this record (so don’t change this value to Write, Read or None) and the template will be visible to this user in the Output formats dialog of the relevant data source. If the Default access rights for the ap-plication have been set to None, then other users won’t have access to this record and won’t see the template in the Output formats dialog. You can add extra occurrences to this field group to specify access rights for other users/roles: Read, Write or Full access rights will show the template in the Output formats dialog, while Read access rights won’t allow other users to edit this record. |
| • | Category – this field is for possible future use, currently it has no function. |
Notes
| • | Once you delete a record, its associated template will no longer be visible in the Output formats dialog, but the template file itself won’t be removed from the designated storage folder. |
| • | Each time you upload a template with the same file name as an earlier uploaded template (which will happen when you are still perfecting your template), a new record will be created in the reports database and the template file will be stored under a unique name in the designated storage folder. It won’t overwrite the previously uploaded template with the same original file name. |
