Setting up GIS functionality

Contents
GIS (Geographic Information System) functionality for Axiell Collections allows for an application to be customized to allow users to register locations and areas by means of their location on a geographical map and also to search for records by a variety of map manipulations to select places, precise spots or areas of different shapes.
It supersedes the deprecated geographical map functionality as described in the previous topic but you could use them side-by-side if needed (because of existing data in Geolocation fields for example). The functionality does require SQL Server 2017 or higher.
Without proper configuration, users won’t notice anything of this functionality. This configuration has a some important variables which require consideration, such as which location/place fields in your databases would you like to have this functionality? Would you like registered locations and areas to be stored in their own records in a separate database with a unidirectional or reverse link to associated catalogue records or is it enough to store a location or area in the catalogue record directly? And which maps and overlays will you be offering? Let’s deal with these questions one by one.
Choosing maps and overlays
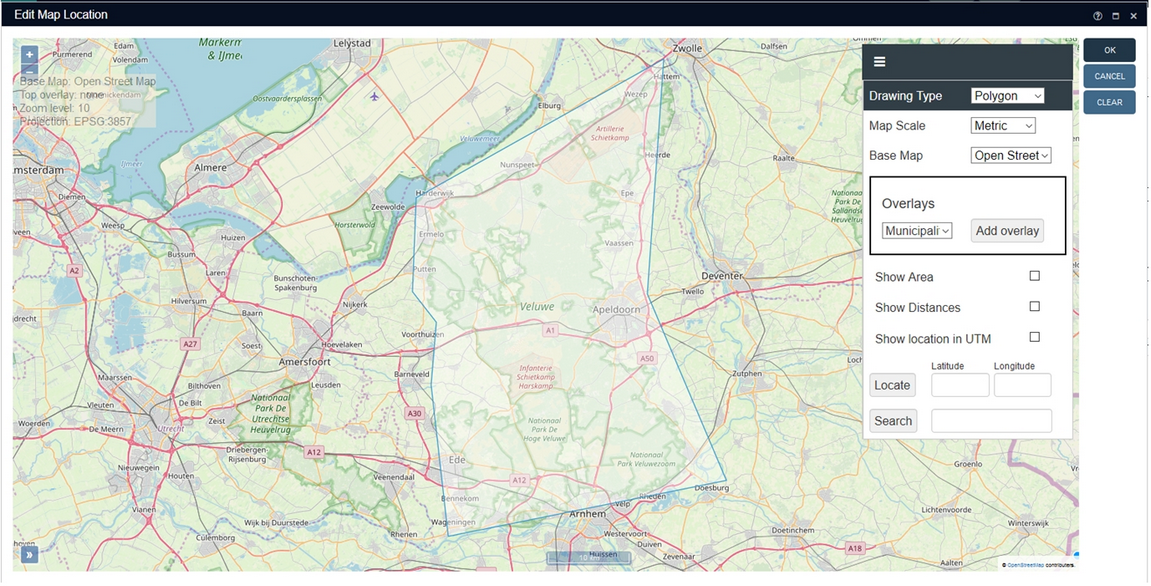
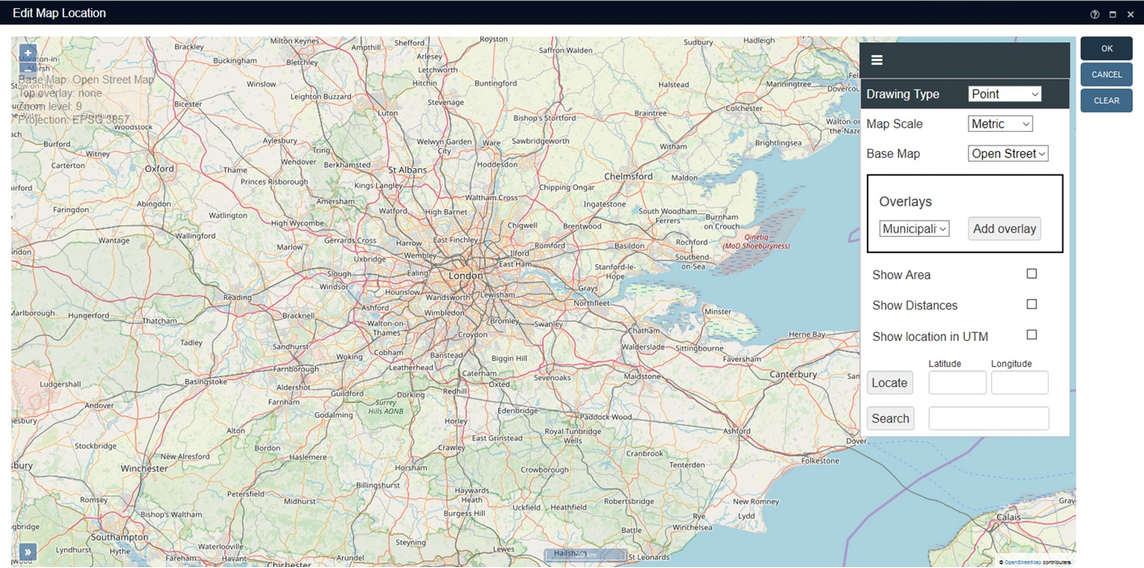
So which maps and overlays do you need? It all depends on the pupose you have in mind. If it is enough to pinpoint locations or areas on a standard geographical map, for a production place field for example, then OpenStreetMap is all you need. But if you need more environmental details you may require a topographical map (as well), for example. Such base geographical maps are made available online by third-party web services. These web services can be free, as with OpenStreetMap which is the default base map the Axiell Collections GIS functionality should always offer, or paid (in which case the costs need to be considered). When considering map web services, know that Axiell Collections uses the OpenLayers library to retrieve map tiles, but the only currently supported map source types are OpenStreetMap and WMTS (Web Map Tile Service).
So-called overlays are map types which add an extra layer to a base map. They show graphical data that a base map typically doesn’t show, like municipality borders, historical sites, demographic data etc. As with base maps, overlays are made available online (often as downloads too) by third-party map providers. These web services or downloads can be free or paid.
For Axiell Collections these overlays (which are of course optional), need to be available as locally stored (on the customer web server) GeoJSON files (with the .json extension).
So you can choose multiple maps and overlays. While registering or searching for a location in Collections, you can always quickly switch between these maps and overlays as your current need requires.
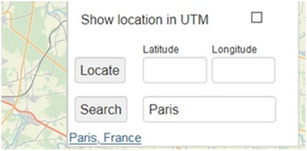
When working with the map display, you’ll also see an entry field with a Search button next to it. This could allow the user to enter a place name and have the map zoom in on that location automatically. This is so-called geocoding functionality and is usually not included in a map service and must be licensed separately by a third-party like Google or other geocoding web service.
Selecting fields
Most Place fields in records are linked to a thesaurus, to allow users to select a place name, like Amsterdam or London, which is sufficient for most cases. But for archeological finds or other historical sites you may need to register their location more precisely or more general than a place name. The Field collection screen for object records for example, offers a Coordinates field group to register a find location more precisely. If there’s no data in this field group anywhere in the database, you could consider replacing it partially with a GIS field. However, if the coordinate fields already contain data in multiple records, some custom conversion procedure would be required to convert that data to the GeoJSON format used by GIS fields before you could replace the coordinate fields. In any case it’s probably best to add extra fields for the GIS functionality and leave existing place fields as they are.
The appearance of a GIS field
In the Collections user interface, a GIS field (of data type Geo-json actually) has a peculiar appearance: it may have a field label but no entry field, just a map icon. The icon is empty if the field contains no data, while it has a map pointer when the field is filled. The user will never see the actual (GeoJSON formatted data) that is stored in the field, only the icon will appear.
![]()
![]()
Clicking the empty icon when the record is in edit mode will allow the user to select a new location on a map (which opens in a separate window) whilst clicking the icon with the map pointer in either display or edit mode will show the earlier selected or stored location on the map. Emptying a filled-in GeoJSON field can be done by clicking the Clear button in the map display.
To link or not to link
So now the question is: where would you like the GeoJSON field data to be stored. In the collect database you could simply add a field of this type, add it as a text field to the Field collection screen for example and be done with it: then you would need to pick a location per object record and the GeoJSON data would be stored in that record as well.
For large amounts of objects that need to be associated with the same location that is not a very practical solution though. A linked field in object records linking to a separate geolocation or geothesaurus database in which geolocations themselves, with a useful name and other metadata, are stored would then be a better solution. That would also allow for a location hierarchy which could be very handy for subdividing large archeological sites, but also for naming locations and for finding all objects associated with the same location. Then you would not only have to add a GeoJSON field to the collect database, but also a linked field linking to the separate geolocation or geothesaurus database, allowing the user to pick a named location from an earlier specified location collection or hierarchy.
Sample implementation
As an example we’ll implement a reverse link between your collect.inf and a new geolocation.inf. Download your sample files here. In the .zip file you’ll find a geolocation.inf and a maps.inf. The maps.inf is the only actually required extra database structure file for the GIS functionality. You only need something like the geolocation.inf if you’d like to store geolocations in their own database and you do not already have some geothesaurus that could be extended a little for this purpose.
| 1. | For this example, copy both downloaded .inf files to the Axiell Collections application \data folder. Then copy the downloaded screens (.fmt files) to your application \screens folder. The .pbk in the downloaded zip file is a stripped application structure with just a Maps and Geolocation data source. Temporarily create a subfolder in your main Collections application folder and copy the downloaded .pbk to it. |
| 2. | Open your application in a recent version of Axiell Designer. |
| 3. | Check that the openLayerMapSource (tag ms) field has been set to repeatable in the maps.inf (not on screen), otherwise no maps will show in Collections. In early delivered model 5.2 applications, the field was unfortunately set to not repeated, so that should still be changed in those applications if maps functionality is desired. In the maps.inf in the linked zip file above, the field has already been set to repeated. |
| 4. | In the maps.inf and geolocation.inf, the Locale and Data storage properties must still be changed to match those of your other databases. First open the Database properties tab of one of your other database structure files, collect.inf for example, and check the Locale setting. Then apply this setting to maps.inf too. When you leave the drop-down list, Designer asks if you would like to apply the change to all databases. Click OK to accept and the Locale setting in geolocation.inf will be matched. Similarly, check the Storage type, the Data source name, Server and possibly User name and Password in an existing database structure file and copy them to maps.inf and geolocation.inf: during copying, click Cancel each time Designer asks if the new data storage settings should be applied to all database structures. |
| 5. | Now right-click the maps.inf in the Application browser tree view and select Clear database from the pop-up menu. You’ll have to confirm your choice. Do the same for geolocation.inf. (The Clear database option actually (re)builds the associated SQL tables for the selected .inf, which is required for new .inf’s.) |
| 6. | Open the temporary subfolder with the partial .pbk in the tree view in the Application browser. Open that .pbk, right-click the Maps data source and select Copy in the pop-up menu. Then right-click your own .pbk and click Paste in the pop-up menu to paste the copied data source. Do the same for the Geolocation data source. By default, the pasted data sources are inserted at the bottom of the list but it you want you can drag each data source to a different position in the list. |
| 7. | In your collect.inf you could now create a reversly linked field to the object.object_number field in geolocation.inf plus a merged-in GIS field. First create the GIS field with tag w3 and data type Geo-json.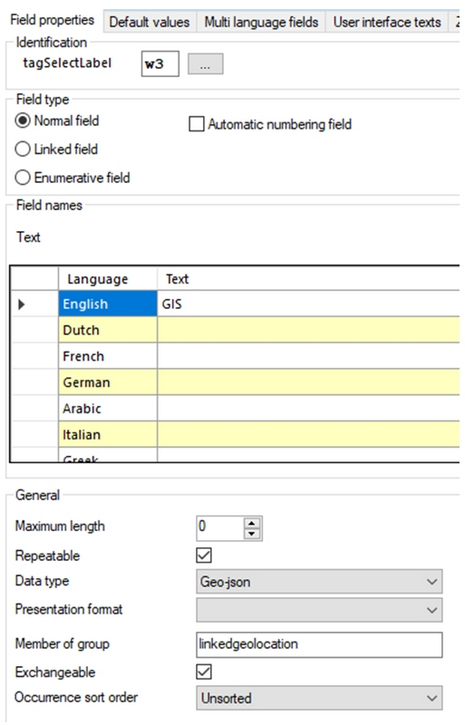 |
| 8. | Now create a link reference field with tag w1, create an integer index for it and reindex it to create the SQL table.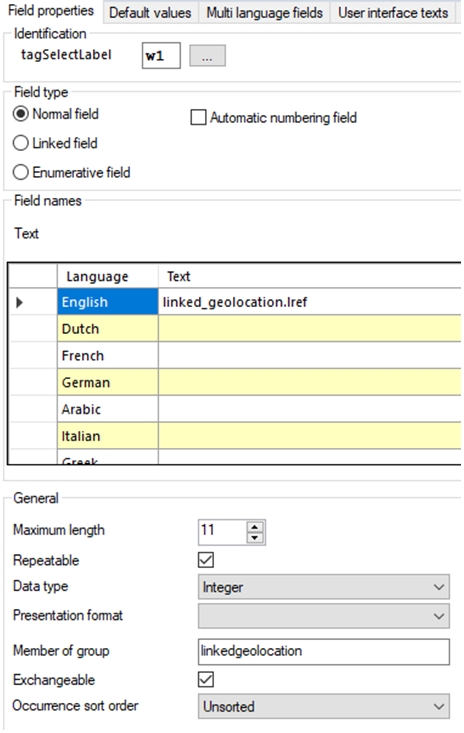 |
| 9. | Then create a linked field to geolocation.inf with tag w2, link reference tag w1 and merged-in and write-back field w3. 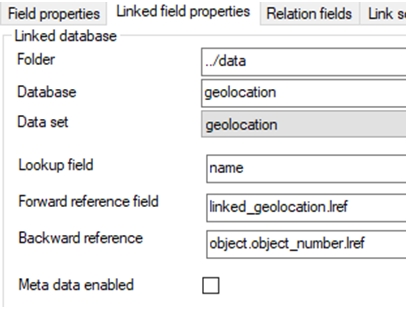 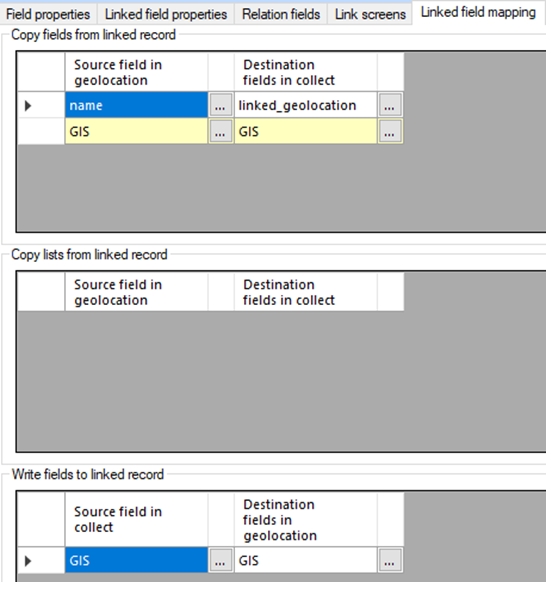 |
| 10. | Now add w2 and w3 as non-repeatable, read-and-write text fields to fieldcol.fmt. w3 doesn’t need to have a label.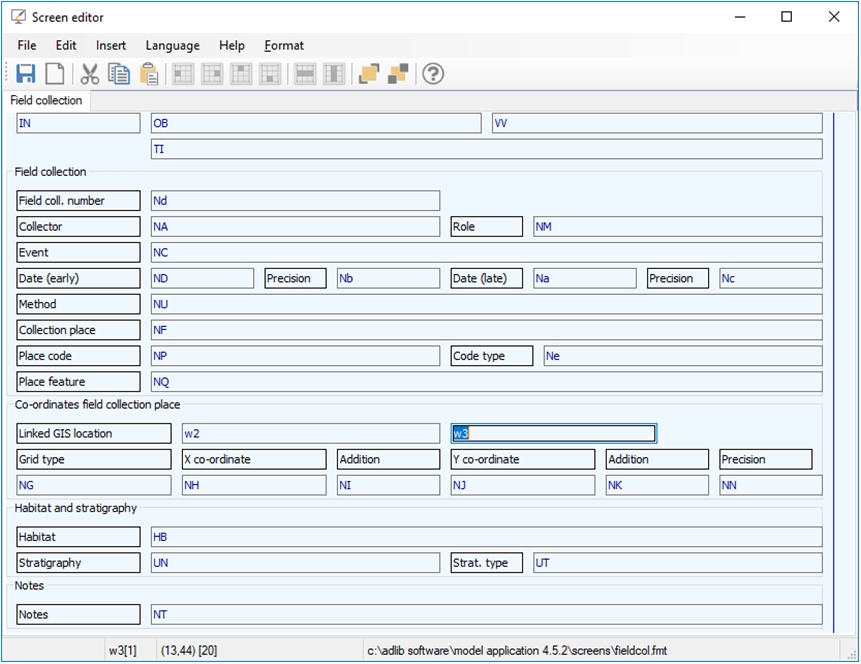 |
| 11. | And finally you can also add a GIS location access point to the Object catalogue, so that users can search using this functionality.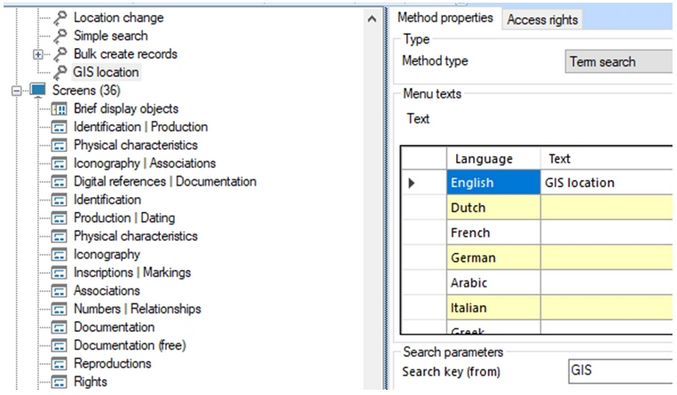 The Method type is just Term search, even though users won’t get to see an entry field. Since w3 is a merged-in field, it must have an index in the linked geolocation.inf (which is already the case). Note that the Key type of that index is the Geography type, especially for Geo-json fields. |
| 12. | Save all your changes to the .pbk, screens and .inf’s where necessary. You can remove the temporary folder containing the partial .pbk that you downloaded earlier. |
| 13. | If you obtained .json overlays, you must place them in a \json folder (don’t change the name) next to the other Collections server software subfolders. For example: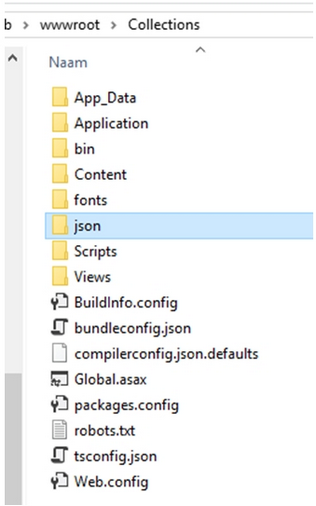 Also keep a backup of this \json folder somewhere else, because each time you update your Collections server software to a new version, the \json subfolder will be removed. So after an update you need to copy your backup of the \json folder to your \Collections folder again… If your overlay files have the .geojson extension, then change it to .json, otherwise Collections doesn’t recognize the files. |
| 14. | If you have obtained an API key for a geocoding service, be sure to enter it in the <ApiKey> node for the relevant <GisProvider> in your Collections settings.xml. The DefaultMapProvider setting is not being used by the GIS functionality (so you could even leave it out), but it does still apply to the older geolocation functionality as described in the previous topic. Do set the DefaultGeocodingProvider to your selected provider; if you don’t have one, set DefaultGeocodingProvider and ConnectionType to None. This switches off the geocoder cache and all geocoding features in the user interface. None is also the default, but better not rely on defaults (as they may change), so do specify the setting explicitly.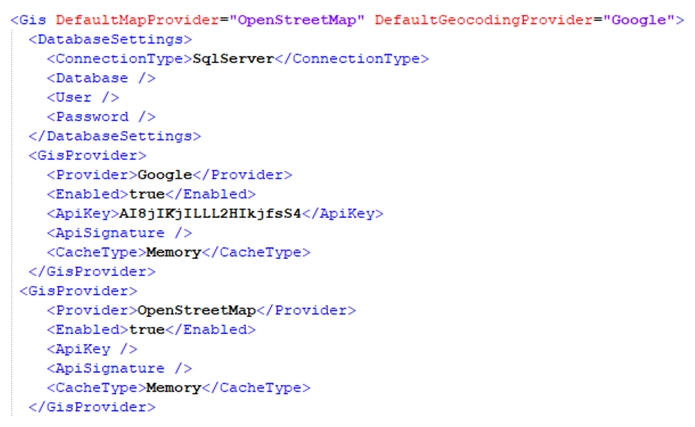 |
| 15. | Recycle your Collections application pool in IIS and restart your Axiell Collections application. |
| 16. | Next, you need to create a Maps record for each base map and overlay you would like to make available to users. (Your base maps need to have been registered in your settings.xml file already and the overlay files need to be present in the \json folder in your Collections installation.) See the following table for an explanation of all the fields you can find in a Maps record. |
Field tag |
Field name in database and in user-inteface |
Field details |
0% |
priref |
Used by Collections (under the hood) to associate a drawn shape or point with a base map and overlay. These details are stored with the geojson data and are not visible to the user. |
bt |
parent.map |
This field is only visible in a Maps record (all the way at the bottom) if the Type field has been set to overlay. The Associated base map field can (optionally) be used to specify which base map the current overlay is associated with, if the overlay requires it. |
cl |
layer.color |
This field applies to overlays only and specifies the colour in which the overlay will be displayed. |
ft |
layer.format |
The value in this field is not used for WMTS any more in Collections 1.19 and up: the format is obtained from the capabilities file provided by the WMTS service, usually WMTSCapabilities.xml, depending on the service.) |
gm |
grid.matrixId |
This value must be provided by the producer of the WMTS base map or overlay, but you can also look it up yourself in the capabilities file from the map service. The ID specified which matrix to use. An example of a matrix ID would be: google3857. They ID is not required for other types of maps or overlays. |
gr |
grid.resolution |
This field is no longer in use for WMTS (since Collections 1.19). It can also be left empty for other types of maps or overlays. |
id |
layer.identifier |
This is really an internal identifier for the layer - not strictly necessary at the moment and currently not used in Collections in any way. |
l3 |
parent.map.lref |
Link between base map and overlay - if there is one. Not visible to the user. |
lb |
layer.label |
This is the mandatory Display name for the layer as it is shown in the user interface of the map menu in Collections. |
ms |
openLayerMapSource |
This is used in Collections to build the layer to display it in the user interface. Currently the only supported sources are WMTS, Open Street Maps and (GeoJSON) Vector maps for overlays. From Collections 1.19, for WMTS, the Source URL, Name and Matrix ID are required. OpenStreetMap only uses the Name and Display name. All other fields are ignored. Vectors use a JSON file from the Collections server. Note that this field should have been set to repeatable in the maps.inf (not on screen), otherwise no maps will display in Collections. |
nm |
layer.name |
This is the overlay or base map name in the source - not displayed in the user interface. From Collections 1.19, for WMTS, this is required and should be the official layer name. Refer to the layer service for what to put in here, or open the capabilities document in the browser and look it up. For OpenStreetMap, it’s whatever layer is required from the OpenStreetMap service. The usual one is OSM. |
op |
layer.opacity |
Set the default opacity percentage for an overlay: this can still be changed in the map user interface though. A typical value is 50. Do not enter a percentage character. |
pe |
projection.extent |
For Collections 1.19 and up you can leave this property empty for WMTS. For non-WMTS layers that use longitude and latitude values, enter four occurrences of this field with the value 0: this works if the base map uses longitude and latitude values as well, like Open Street Map, so it can figure out the scope of what is visible itself. For non-WMTS layers that use UTM coordinates (values with-out decimals), enter four occurrences representing the extent (bounding box) expressed as UTM units – so, which coordinates your overlay fits within. You need this in conjunction with the UTM zone (in the Attributes field) in order to overlay the map in the correct location. |
pi |
projection.identifier |
This code represents a projection coordinate system and is used in Collections in the user interface: it would be provided by the producer of the map. The value for Open Street Map is ESPG:3857 (note the spelling error, but do not correct it to EPSG). If no code is available for a map or overlay, try EPSG:29999. |
px |
projection.extension |
For Collections 1.19 and up you can leave this property empty for WMTS. For non-WMTS layers that use longitude and latitude values, enter +proj=longlat +datum=WGS84 +no_defs in the field. For non-WMTS layers that use UTM coordinates (values with-out decimals), enter +proj=utm +zone=<the UTM zone> +ellps=GRS80 +unit=m +no_defs in the field and replace <the UTM zone> by the actual UTM zone covered by the map. |
sr |
layer.source |
This mandatory property is used to identify and credit the creators of the map - this could be any text or html - in some cases this must be a specific text, like for Open Street Map you should always enter Copyright Open Street Map. The attribution appears to the bottom right of the map. |
su |
layer.url |
Used in Collections in the case of WMTS or GeoJSON Vector layers to provide information on how to build the map, typically a URL (possibly including a license key) provided by the producer of the map. OpenStreetMap doesn’t need a URL. From Collections 1.19, for a WMTS map, this property should be filled with the URL to the WMTS capabilities document (normally WMTSCapabilities.xml, but it could be called anything, depending on the service). For a Vector layer, this should be the URL to a GeoJSON file. For downloaded overlays, fill in a relative (relative to the main Collections folder) path to the \json folder in your Collections installation. Typically, this is something like: ./json/townships.json |
tp |
layer.type |
This mandatory field specifies whether the layer is a base map or an overlay. In Collections, only one base map can be selected, while multiple overlays can be projected over the base map at the same time. A base layer is only appropriate if the map is full and complete. Many overlays on the other hand, might only contain information for a specific geographical area and no data for the rest of the world. |
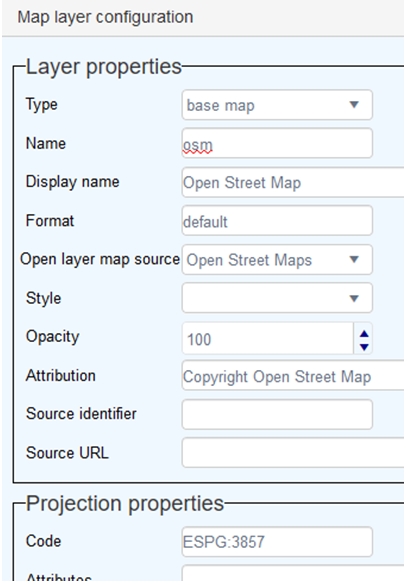
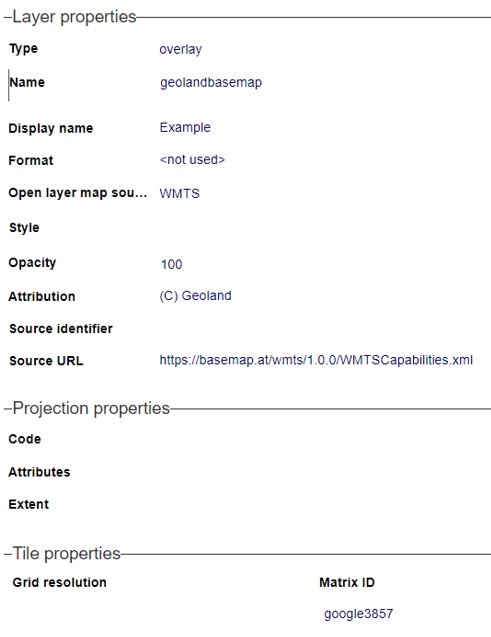
At least create a record for Open Street Map, with the following data. (Note that for this particular base map a Source URL is not required because the OpenLayers library used for the GIS functionality already knows where to find the relevant web service.)
Example of an overlay record for WMTS:
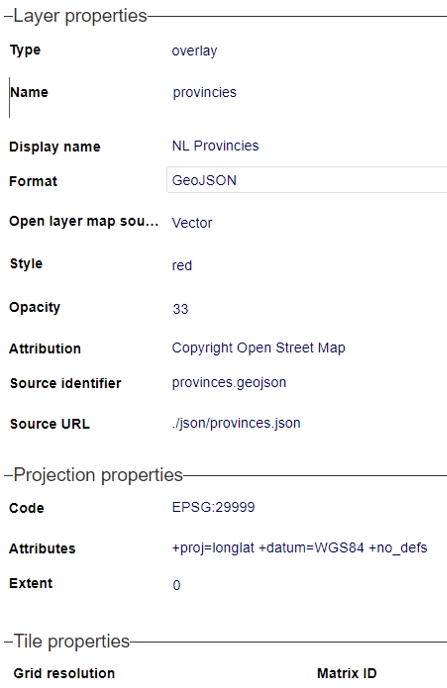
Example of an overlay record for Vector:
Working with the sample implementation
So now you’re finally ready to start working with your GIS implementation. In our sample we have a Geolocation data source which you can start filling with records. A single point or shape is typically called a feature while a collection of points or shapes is called a feature collection. You could create a feature collection as the parent of a list of features, if you find it useful. The name you choose for the location can be abstract or descriptive, whatever makes sense. Click the empty map icon to select the location on the map. See the relevant Collections online Help topic for more information about how to use the map interface. You could also link this location to one or more objects. Note that the possibility to link to objects from within this data source is no requirement in general at all. In a custom implementation of your own you may find it better to leave it out if thousands of objects will be linked to a single location: it might have a serious performance impact when such a record is opened.
This sample implementation also has an access point in the Geolocation data source. You may have to select the GIS access point via the Settings button before you can use it. Clicking the map icon allows you to draw an area in which you’d like to search for locations registered in the Geolocation records.
In the Object catalogue you can also find a GIS location access point, so you can find objects within a certain area once you’ve linked object records to a Geolocation record.
In new or existing internal object records you could now link to a Geolocation record, as well as you can link a Geolocation record to multiple object records, because in the sample implementation we created a reverse link between these databases. So once you link to an existing Geolocation record, the map icon will get a location pointer because the actual location is merged in. And since we made the GeoJSON field a write-back field too, you could even change the location on the map here and save the object record to have the new location written back to the Geolocation record. Of course this would mean that all other object records linking to that record would also be associated with that new location. In a real-life implementation you may not want make the GIS field a write-back field at all. The sample implementation is just to make you aware of the possibilities. From the object record here you could even create a new linked Geolocation record with an appropriate map location, by creating the new name in the Find data for the field window first and then adding the map location…