Creating a prompted output format for Axiell Collections
Designer 7.7 and Collections 1.7.3 and higher support so-called prompted output formats. These are normal, predefined output formats that, after selecting one, first present an entry form to the user, allowing him or her to enter some extra details pertaining to the print job, before actually printing. These details may just be some extra information to be printed (like a user name or date or reason for printing) or some data with which the output format must still do something (although that data cannot be used to filter out some of the marked records from printing).
Creating your first prompted Word template output format
Let's create an adapted Brief object print (1 object per page) output format, as you can find in the Internal object catalogue data source. This output format is based on the ObjectDescriptionOneObjectPerPage.docx template in the Worddoc/templates subfolder of your Axiell application folder. Say we'd like to print the user name, the date of printing, the reason for printing and a description or summary of the printed record selection, all to be entered by the user.
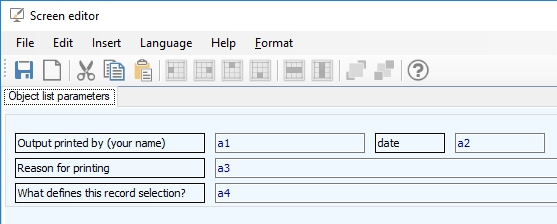
We may begin by making a new entry screen for the user to enter these details. We name it Object list parameters and put three text fields and one date field on it. We can use field tags of existing fields or invent new ones - in either case they won't conflict with any existing field definitions in an .inf - but in our example we create new ones: a1, a2, a3 and a4. We save it under the file name objectparametersscreen.fmt, but any name will do.

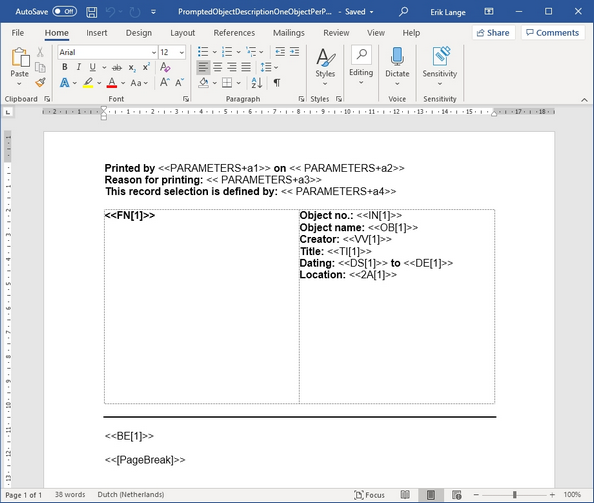
Now let's copy the ObjectDescriptionOneObjectPerPage.docx template and rename the copy to PromptedObjectDescriptionOneObjectPerPage.docx, for example. Edit the template and add normal references to the fields from the parameters screen but precede each field tag by PARAMETERS+, <<PARAMETERS+a1>> for example. PARAMETERS could be considered the name of the implicit FACS buffer that will hold the field contents entered by the user on the parameters screen. Adapt the template to something like the following, for example:

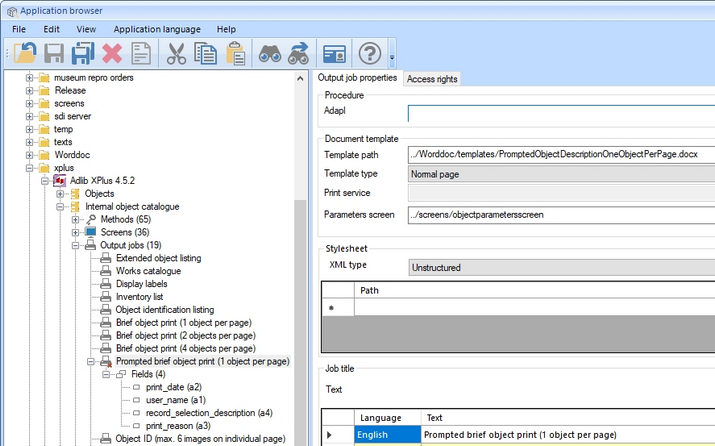
Now all that's left to do is specify the new output format. Initially, create a new output format like you would do normally. In the screenshot below you can see a Prompted brief object print (1 object per page) output format with the Template path option set to the new template. You'll also have to enter one or more Job title translations, but enter at least an English one. Different from normal output formats is that you have to set the Parameters screen option to the new screen we created. Important too is that you'll have to create field definitions (in this context called parameters) for the fields used on the parameters screen, underneath the new output format. These parameters have no relation nor interference with the normal database fields. You may create new fields for the output format by right-clicking the output format (or the Fields header underneath it, if already present) and selecting New > Field in the pop-up menu. Or you may copy suitable field definitions from an .inf to this output format and edit them at will, because after including a field as a parameter they will be completely separate from the original field definition in the .inf. The requirements for these fields are the same as for tasks: linked fields still need a linked database and a link reference field and you will have to define their Linked field mapping (merged-in) destination fields in the field list as well. Fill out or check the appropriate parameter properties as you would for database fields.

Recycle the Collections IIS application pool when you're done and the new output format should be ready for use.
An output format with an adapl
An output format doesn't need to consist of just a Word template though, you may combine a Word template with an adapl too, for example, if you want the adapl to do some preprocessing of data. In the adapl you can access the data entered in the parameters screen by creating a FACS declaration named PARAMETERS (always use this name). There's no need to OPEN this FACS declaration since it is not a real database: after this declaration we can just use the FACS parameter aliases as if they were normal FACS field tag aliases.
For the output format created above, we could write a FACS declaration like:
fdstart PARAMETERS ''
a1 is user_name
a2 is print_date
a3 is print_reason
a4 is selection_description
fdend
In the adapl, data which you write to fields of a regular, opened FACS database will persist in the FACS buffer as long as records are being processed and the relevant FACS database isn't opened again. That way you can collect data from all marked records and only do something with it during the processing of the last record.
General comments on the prompted output format functionality
| • | A parameters screen doesn't necessarily need to have fields on it. Since the screen will still contain an OK and Cancel button, you can use it as a confirmation dialog for the user, before actually starting the printing. You can just place a label on the screen or specify a screen title containing your message. If the screen contains no fields, you don't need to provide a PARAMETERS FACS declaration in any associated adapl either: after all, there is no data to transfer from the screen to the adapl. |
