Interface functionality: using the object list grid view

Contents
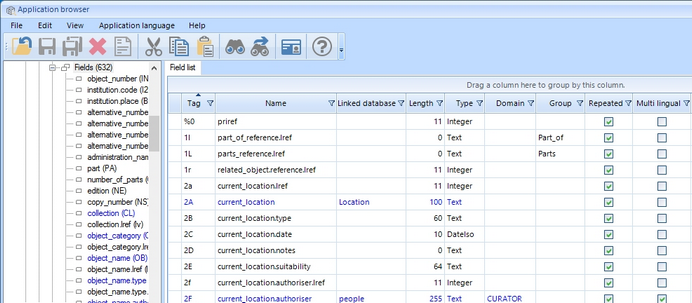
The Field list grid view (which becomes visible once you click the Fields list header in the tree view of a database definition in the Application browser), the Index list grid view, the Method list, the Dataset list, the Internal link list, the Feedback database list, the Output job list, the Friendly database list, the Export job list, the User list and the Screen list have been revamped in Designer 7.4, offering a lot of features. Since these features are the same for all grid views, we'll illustrate them by the Field list grid view only.
| • | You now have full control over which columns (properties of fields really) are being displayed in the grid. To hide a column, right-click the column header with the property name and in the pop-up menu, click the Hide column option. 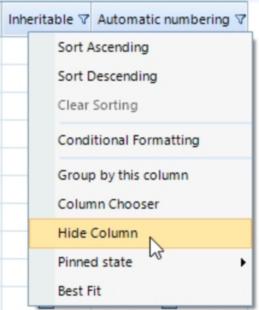 To add new columns to the grid, right-click any column header and in the pop-up menu, click the Column chooser option. The Column chooser lists the properties available for grid display: double-click the desired property to include the column in the grid view. The newly added column will be positioned on the far left initially. 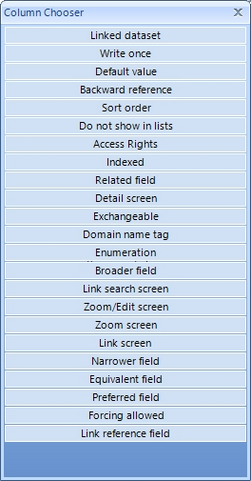 |
| • | You can drag any column by its header to the left or right to another position, if you like. You can also resize the width of a column by dragging its right header edge, or right-click the column header and select Best fit to make the column as wide as the longest value in that column.  |
| • | Columns can be pinned to the left or right of the Field list window pane by right-clicking the desired column header and selecting Pinned state > Pin at left/Pin at right in the pop-up menu. This means that such pinned columns will be fixed to either side of that window pane and won't move if you scroll the grid view left or right (only if the Field list window pane is not wide enough to display all columns at once). A pinned column, a Name or Tag column on the left for example, makes it easier to see which properties in columns on the far right belong to the field(s) you are interested in: just scroll the grid view horizontally to bring them closer to the pinned column(s). You can unpin a pinned column by right-clicking the desired column header and selecting Pinned state > Unpin column in the pop-up menu. 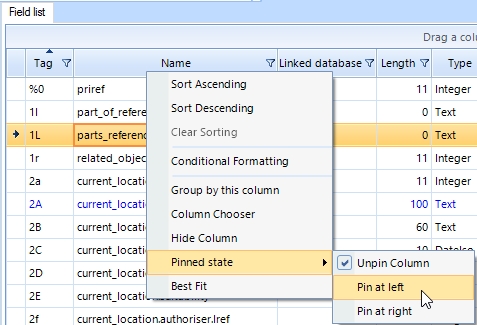 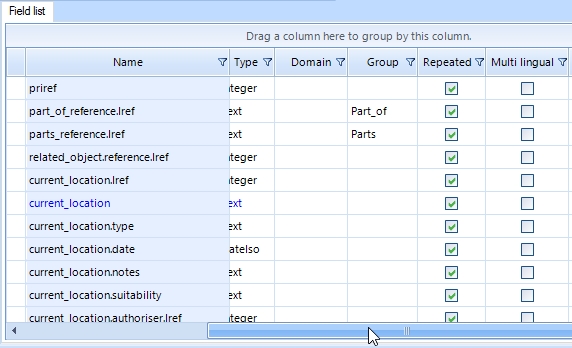 |
| • | You can sort the grid view on any column alphabetically - ascending, descending or sorted in the chronological order the field definitions were originally created - by clicking the (middle of the) desired column header once, twice or three times. A little black arrow above the header label pointing upwards indicates an ascending sort. When it points down it indicates a descending sort, while chronological sorting is applied if none of the column headers display the little black arrow. |
| • | You can group fields by one or more properties, by dragging column headers to the Drag a column here to group by this column bar just above the column headers (or by right-clicking the desired column header and choosing Group by this column in the pop-up menu). Suppose you'd like to group all linked fields per domain per linked database, then first drag the Linked database column header to the bar above it, followed by the Domain column header. Per linked database you now have a group of domains (if present) containing an applicable group of linked fields: each group can be expanded or collapsed by clicking the little arrow in front of its label. The screenshot below shows two fields l7 and VV which apparently are the only fields in Collect linking to the MAKER domain in the People database. Note that you can change the group sorting as well, by clicking the labels of the Group by properties. Clicking the little crosses in those labels will remove those properties from the grouping. 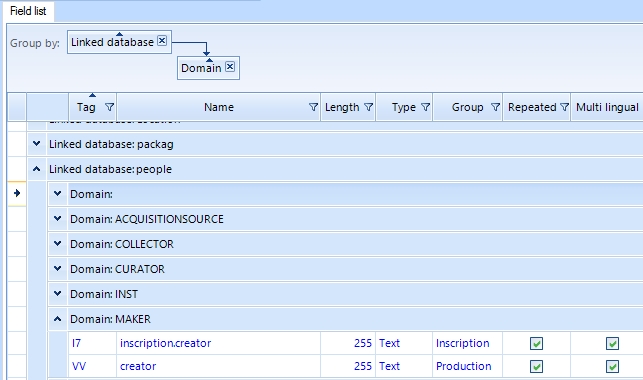 |
| • | You can apply filtering to the list of displayed fields so that it only shows fields which meet your filtering condition(s). Each column has its own filter allowing you to filter the displayed list on any of the currently available values in that column. So typically you would filter on values (or partial values) that appear repeatedly in the column, like the name of a linked database, the name of a field group, a specific field data type. Per column you can set a single filter, but you can set filters for multiple columns. Click the little funnel icon on the right side of a column header to open the filter settings for that column. The following functionality is available here: - You can resize the filter list by dragging its lower right corner, but you cannot move this window. - By default, all available values are marked, so that no filtering takes place by default. - Deselect all checkboxes at once by clicking the marked All checkbox. 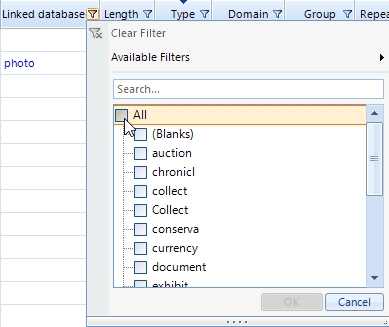 - Click the desired checkbox(es) in front of individual values to filter on them. 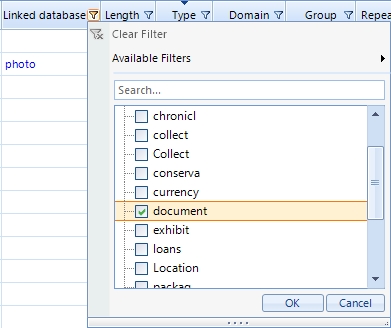 - If the list of values is long and you already have an idea of what you're looking for, you can start typing that value in the Search... box. The list of values will be updated according to your search, for you to find and mark the desired value(s) more easily.  - Once a filter has been set for a column, the funnel icon becomes orange. - To remove a filter, click an orange funnel icon and select the Clear filter option in the filter list. 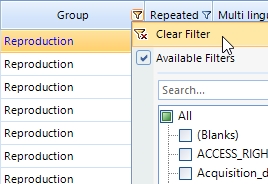 - The Available filters option in the filter list allows you to set a filter by means of a single or Boolean combined string comparison. This filter type replaces any filtering set up via the checkboxes in the list of values. For example, if you'd only like to see field tags which contain a percent character, you'd first select the Contains filter in the sub-menu of Available filters. 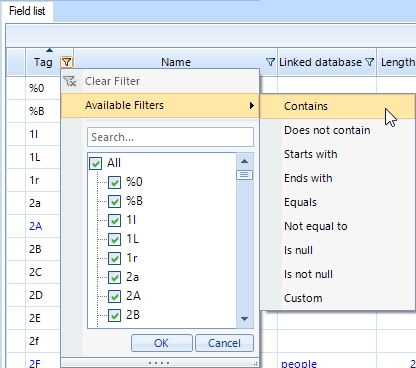 In the Filter dialog you then specify your filter. The Contains operator has already been selected. Behind it, enter the character(s) to filter on, % in this example, and click OK. You can even provide a second condition here and combine it with the first using the Boolean And or Or. By marking the Not checkbox you would negate the truth value resulting from the filter condition(s): so if you were interested in all fields not containing a percent character you would extend the current condition by marking the Not checkbox (which of course would have the same result as using the operator Does not contain and leaving the Not checkbox deselected). 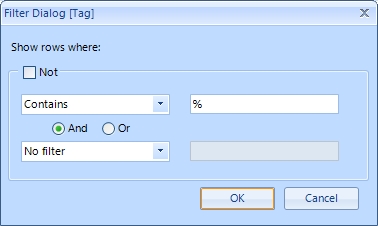 |
| • | The Conditional formatting option in the right-click pop-up menu finally, offers some really advanced options to format the layout of rows based on certain conditions or expressions. Although the option is active, it's sort of meant for possible future use and we currently do not recommend using it as the settings you make won't be remembered for next time. |
| • | The settings that will be stored between sessions are: - column order - column visibility - column width - column pinned state - sort column and sort order |
Finally, note the following:
| • | Three properties of some objects, like fields, methods, screens and indexes, cause those objects to be coloured in either ochre (fields of which the properties are overridden in at least one dataset), blue (linked fields) or red (objects with access rights). |
| • | double-clicking a field row will always take you to the actual field definition. |
| • | You cannot edit checkbox properties in the grid view by clicking them. |
| • | You do have some bulk edit operations at your disposal in the right-click pop-up menu for selected field rows, but these are powerful options if used for large selections of fields so be careful when using them: |