Designing different screen types (for Adlib Windows applications)

Contents
Adlib screens must satisfy certain requirements, to function properly as a detailed display screen, a brief display screen, a zoom/edit screen, a search screen (Query by form), or a link screen. When studying your existing application and screens, there are some points that may need clarification. In this Help topic, some of the loose ends will be tied together.
In Adlib for Windows there are no default screens, except an implicit default for link screens (see below).
Although not relevant for the functioning of a screen, its name is usually indicative of its use; click here for an introduction to screens.
Detailed display screens and zoom/edit screens
In principle, zoom and edit screens are not different from detailed display screens, but for a linked record in another data source you can only display one zoom and edit screen, while for records in the current data source you usually display a number of detail screens that together hold all data from a record.
Zoom and edit screens can be associated with either data dictionary fields or screen entry fields, through their properties.
Detail screens (and brief display screens too) must be linked to a data source in an application definition by listing references to the desired screens underneath a data source Screens node or an individual method node.
A detail, zoom or edit screen typically contains several boxes directly below each other, to visually group entry fields and labels. The order in which you place new objects on a screen is not relevant; if objects overlap, for instance if a box hides fields underneath it, you can always change the stacking order and/or move objects away.
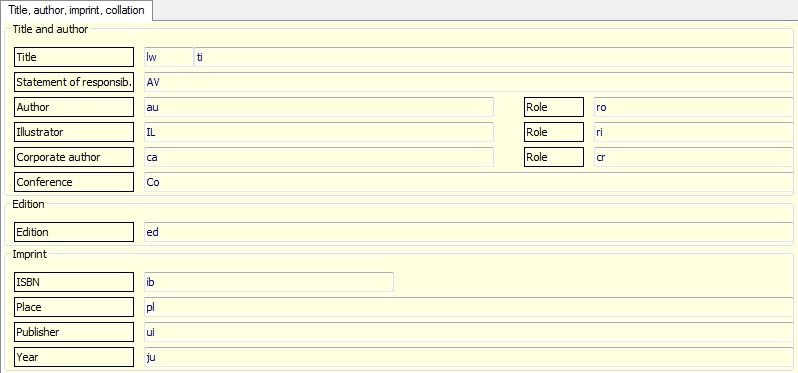
In Adlib Windows applications, detail screens edited in Designer contain no (visible) parameters like they did in DOS. The only two relevant parameters that may be present on the screen are DISPALL and EDIT, but you'll only find these in a different form as the screen property options Show empty fields and Read-only. A typical detail screen for library is booka.fmt (Title, author, imprint, collation), or objid-in.fmt (Identification) for museum - both to be found in the \screens folder or in their respective application folders.
For some detail screens (depending on the application and data source), a Before-screen adapl has been set in the screen properties, for instance dispcat for the library catalogue screens. This particular adapl empties some fields that must contain unique values after the user has copied a record, and it formats and concatenates data from the Title and Author fields, and puts it into another tag, in this case BR. On top of all detail screens (except in booka.fmt) this short reminder of what record the user is viewing or editing, is displayed in a read-only entry field associated with that database tag BR.
Search (Query by form) screens
A search screen is built up like a detail screen, but the entry fields on a search screen must be associated to data dictionary fields in which the user can search, so indexes for all these fields are necessary.
In a running application, there are two situations where a Query by form can or must be used to search:
| • | After a user has chosen a data source, there is of course the rest of the Search wizard, but you can also specify that the user is allowed to use a general Query by form to search the current data source, and/or to use the Expert search system. These options must be specified explicitly by listing a method of each of these types, for the data source, in the same list as the access point methods. In the properties of the Query by form method you specify the Menu texts that will appear in the Start > Query by form submenu of a running application. In the screen list underneath the Query by form method node in the Application browser, you typically define only one reference to a qbf screen. The results of a qbf search by the user will be displayed in the brief display screen specified for the current data source. |
| • | If a user wants to derive a record from a friendly database, that record has be searched for first. The normal way of doing so is through a Query by form search screen. This screen must then be referenced in the Search screen property of the concerning friendly database. (Friendly databases are specified underneath the data source node in an application definition, from where deriving will start.) The results of a qbf search by the user will be displayed in the Linked record search screen window (see the Adlib User guide), because it concerns results from a linked database; you need to specify a link screen (see below) for the Search result screen property of the friendly database, if you don't want the Linked record search screen window to just display a list of record numbers that result from the user's search. |
Brief display screens
A brief display screen (one per data source is mandatory from Collections 1.16) is used for presenting a selection of records, the search result if more than one record has been found. Brief display screens must be linked to a data source in an application definition by listing a reference to the desired screen underneath a data source Screens node or an individual method node.
There are three ways of constructing a brief display screen, but the first part is the same for all three methods:
On the left side of the screen, place one menu option (checkbox) and assign it the reserved tag *1: the software will use the binary value in *1 to determine whether the user marked a record or not.
Next to the menu option, on the right, place at least one system field and assign it the reserved tag *A: this reserves the space of one line to display data from each listed record. (If you want to reserve more lines*, because you want to display lengthy data for instance, place one, two, three or four subsequent system fields underneath the first, and associate respectively the tags *B, *C, *D, and *E.) Then use one of the following three methods to complete the screen:
| • | Only system fields (method 1) - To specify what data and fixed text must be concatenated and displayed through *A etc., open the properties for the screen itself and on the List fields tab specify the desired database tags and separator texts. In an old version of the br_thes.fmt file (Brief display thesaurus) for instance, the following tags and texts may have been defined: Tag Text (English) te ** ( do / ** ) In a running application this could result in for instance: book (documentation type) or book (documentation type/library object) Text for ** separates values from database tags, while text for the tags separates any occurrences of those tags. |
| • | Entry fields and labels (method 2) - To specify what data and fixed text must be concatenated and displayed through *A etc., you can also place normal entry fields and labels on this screen: the entry fields must be associated with the database tags that you want to display, the labels with the fixed texts. Currently there is no way to tell the difference between a label connected to an entry field, which holds field occurrence separator text, and a separate label that contains field separator text (bug ref.no: 1735). The entry fields and labels that you place on the screen can be next to each other or underneath each other. The space between is not relevant, nor is the length of the entry fields, but the order of their placement is (which is determined from left to right and top to bottom), because it determines the order in which the data and texts are concatenated. The br_objec.fmt file (Brief display objects) for instance, looks somewhat like this: 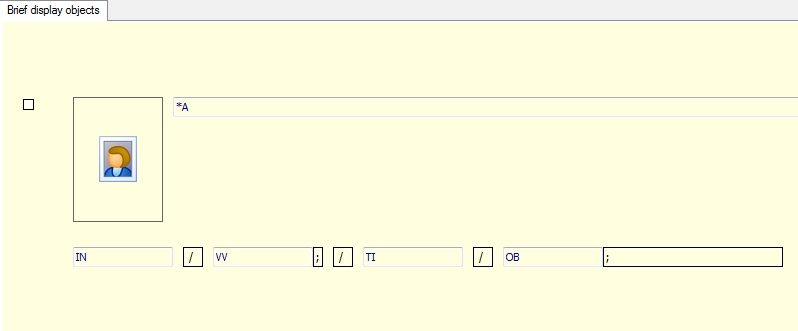 Note that this way of constructing a brief display screen does not use the List fields tab in the screen properties. |
| • | Using an adapl (method 3) - Using the first method to construct a brief display screen, you can also list just one tag on the List fields tab, and have this tag filled by a Before screen adapl that you set for the screen. This allows you more freedom in the concatenation, and the possibility to use the same brief screen for different data sources. Old versions of the br_catal.fmt file (Brief display for several library data sources) for instance, have only a menu option and two system fields, *A and *B, beneath each other. In the screen properties the Before screen adapl brformat has been set, and on the List fields tab only the database tag BR is listed (without separator texts); the adapl formats and conditionally concatenates data from several fields together with fixed separator texts, and puts it into another tag, in this case BR. In newer versions of this screen, the tag BR is not listed on the List fields properties tab, yet is present in an entry field on the screen:  Note that you cannot use the before screen adapl to sort the records that will be listed on this screen. |
* Forcing a line break on brief display screens
From version 7.4 you have the option to force a line break between the displayed fields, using <br> as the text for an in-line label on the brief display screen in design mode. You can implement a line break if you have at least two system fields specified on the relevant brief display screen and if the screen lists the fields to be displayed on the screen itself (as can be seen below) or if the fields to be displayed are listed on the List fields tab of the screen properties dialog. Since the latter option isn't used much any more, we'll show the setup for the first case.
First realize that a brief display screen always has one or more system fields (*A, *B, *C, *D and *E). These system fields function as sort of a place-holder for the actual field data while the number of system fields you place on the screen indicates how many lines Adlib will reserve for the data of each record listed in the brief display of a search result. So if you only have system field *A, only one line of text can be displayed per record, while *A and *B reserves two lines of text. If your brief display screen only contains *A, the displayed line of data in the search result can get as long as the Adlib window is wide: if you were to narrow that window, you would see that a long line of data would just be cut off when it no longer fits the width of the window. If you often work with narrow Adlib windows, adding the *B system field would already be beneficial: a long line of text would then be word-wrapped to continue on the second reserved line. In other cases though, where the Adlib window is wide enough and you don't need word-wrapping but you would like to spread the displayed fields per record over different lines, simply because you think it would improve readability and layout of the screen, then from Designer 7.4 and Adlib 7.4 you can force such a line break if the screen has at least two system fields to display the extra line(s).
| 1. | Add any desired systems fields by right-clicking the screen and selecting New > System field in the pop-up menu. Click the new field and type the next available system field. So if *A is already on the screen, use *B next. Drag the new field underneath the already present system field(s). |
| 2. | Right-click the screen again and choose New > Label in the pop-up menu. Type <br> in the label. Right-click the label and also add <br> for the other available interface languages. |
| 3. | Move over some of the existing data fields and labels or make them a little less wide - this won't affect the available space for the fields on screen - and move your new <br> label to the place where you'd like to see the forced line break. |
| 4. | Save the changes to the screen.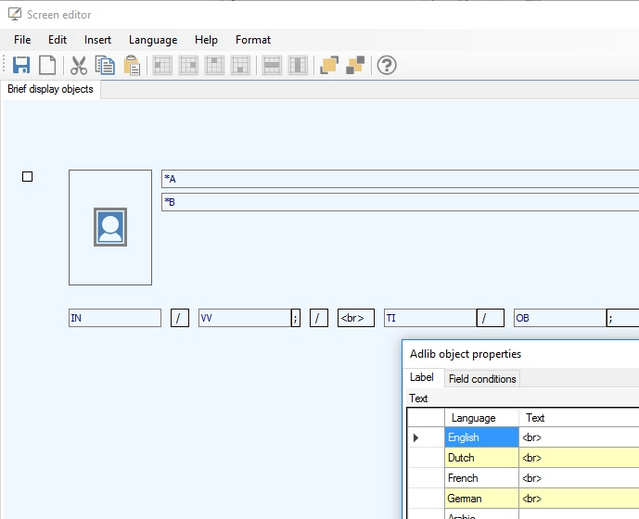 |
| 5. | After restarting Adlib, you can see the effect of your changes in a search result which uses the brief display screen that you adapted: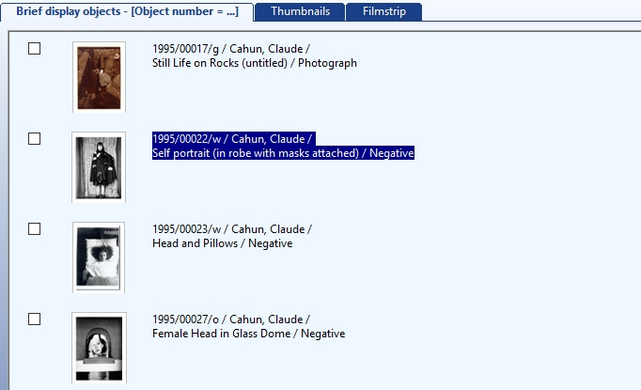 |
Link screens
Although it is no longer recognizable as a screen, the Find data for the field... window (better known as the Linked record search screen) can use a link screen (associated with the linked data dictionary field) to determine what fields to list on the View table tab when the user presses Shift+F4 or clicks the List button in the relevant linked field.
A link screen contains only two lines of screen elements. The top line consists of labels for the entry fields below them in the second line. Adlib converts this link screen to the View table tab in the Linked record search screen: with the labels on the link screen you specify the column headers, and with the fields the contents of the columns on that tab.
The lnk_copy.fmt file for instance, which is used in a library application when the user asks for a list of values in the copy.number field on the Copies and shelf marks tab. Since a list of just all copy numbers is not informative, the user gets to see the title of the document and an associated copy number, for each registered copy. So if a title has four copies, it appears in the list four times, with four different copy numbers. The layout of lnk_copy.fmt is as follows:

You can see two labels on top, and two normal entry fields below them (each label is connected to the entry field below it). The label texts must of course be entered in as many languages as you wish to make available to users of your application. The screen properties themselves are default, except that the Screen descriptions are empty and the Show empty fields option has been unmarked.