Interface functionality: editing job properties

Contents
If properties of an object are displayed in white or yellow entry fields, you can edit them. (The yellow colour is just for visual presentation, it has no special meaning.)
![]()
Just click in the entry field, and delete or type characters.
If properties of an object are displayed in greyed out entry fields, you cannot edit them: they are read-only.
Choosing a value from a list
Behind a number of entry fields, you'll see a grey button with three dots on it (see the figure above). Click this button to either open a list of files/objects that are available for the current property, to search your system for a specific file/object, or to create a new file/object at a specific location on your system. Whenever the button is available, you are advised to use it. For properties that need a tag or field or other object name (like a dataset name), the list offers all the objects that you can enter for this property, and choosing one from the list makes sure the name is spelled just the right way and that any path to the object is entered correctly.
Even though when you type values yourself, sometimes they are validated against the list that you open with the ... button, there is still a chance that by typing you enter incorrect values, either because you forget that certain values are case-sensitive or because you remembered the name of a tag incorrectly. So use the ... button whenever possible. It helps enormously to be able to just choose from the values that apply for the current property. For example, for the properties of an import job you can choose the destination Database name from a list of database files, and then you can choose the Update field from a list of (indexed) fields available in that database!
In the list window that opens when you click the ... button to search for a database field, you choose a field either by double-clicking it, or by selecting it and clicking the OK button.
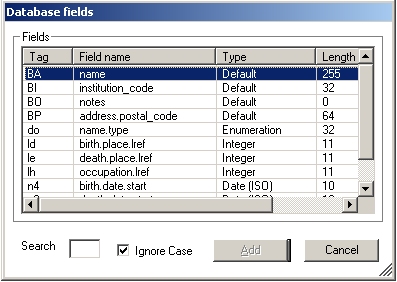
You can sort the list on any column ascending or descending by clicking the column header once or twice.
You can jump to a spot in the list that begins with a certain character by typing that character in the Search entry field. If you select Ignore case, the tags searched with the character(s) that you provided can be upper case as well as lower case.
If in the Search field you type a tag that does not exist yet, and you click Add, the new tag is forced in the field property, but no field definition is created in the concerning database table, so use this option sparsely, if at all.
Change the name of an existing job
If you change the name of a job through its properties, and save the job, the new name/job will also appear in the job manager. The job will be saved under the new name; the job file with the old name is not deleted.
Moving through properties
You can easily move downwards through properties by pressing Tab on your keyboard, or Shift-Tab to move upwards.
Editing mappings
On the Mapping properties tab for an import job, you'll find a tag pair mapping.
A new row at the bottom will automatically be created as soon as you enter something in one of the fields of the current bottom row. Or right-click a row and click Add in the pop-up menu to directly add a new entry at the bottom of the mapping list. From Designer 7.3 you can also insert a new row anywhere in the mapping (instead of just adding a new row at the bottom). This is handy when you are extending a long mapping which you'd like to keep in a certain order. In the mapping, select the row above which the new row must be inserted, right-click the selected row and choose Insert in the pop-up menu.
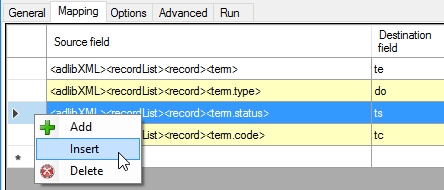
Click Delete in the pop-up menu to delete the currently selected mapping entry.
Click a cell in the mapping to edit it. In the Source field and Comments cells you must type a value yourself. The cells in the Destination field column however have a special function: clicking a cell behind a Source field/Destination field cell pair, opens a list with all fields/tags that you can choose from. Select a field from this list, and the associated tag is automatically filled in in the Destination field cell, next to the field name that you selected.
See also
Accessing the job managers and editors
Managing import and export jobs
Running import and export jobs