Interface functionality: editing database object properties

Contents
If properties of an object are displayed in white or yellow entry fields, you can edit them. (The yellow colour is just for visual presentation, it has no special meaning.)
Just click in the entry field, and delete or type characters.

If properties of an object are displayed in greyed out entry fields, you cannot edit them: they are read-only.
Sometimes you can only choose values from a drop-down list. If such a property reads "Undefined", it means that for that property the default value will be used: usually the default value is the first value in the drop-down list.
Choosing a value from a list
Behind a number of entry fields, you'll see a grey button with three dots on it (see the figure above). Click this button to either open a list of files/objects that are available for the current property, to search your system for a specific file/object, or to create a new file/object at a specific location on your system. Whenever the button is available, you are advised to use it. For properties that need a tag or field or other object name (like a dataset name), the list offers all the objects that you can enter for this property, and choosing one from the list makes sure the name is spelled just the right way and that any path to the object is entered correctly.
Even though when you type values yourself, sometimes they are validated against the list that you open with the ... button, there is still a chance that by typing you enter incorrect values, either because you forget that certain values are case-sensitive or because you remembered the name of a tag incorrectly. So use the ... button whenever possible. It helps enormously to be able to just choose from the values that apply for the current property. For example, for the properties of a linked field you can choose the linked Database name from a list of database files, and then you can choose the Lookup field from a list of fields available in that linked database! Similarly, you can choose your Forward and Backward references from the appropriate field lists too.
In the list window that opens when you click the ... button to search for a database field, you choose a field either by double-clicking it, or by selecting it and clicking the OK button (not visible in the reduced image of that window, below).
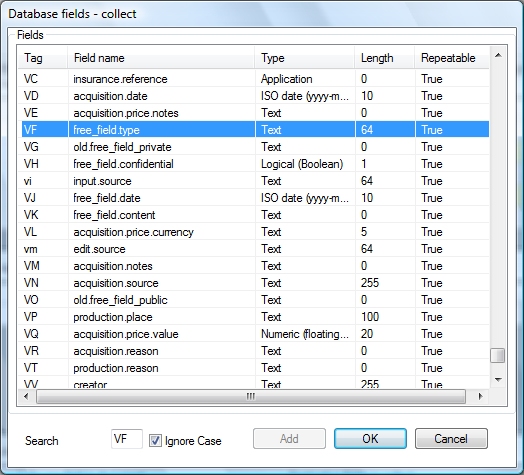
You can sort the list on any column ascending or descending by clicking the column header once or twice.
You can limit the list to all tags that begin with a certain character by typing that character in the Search entry field. Remove it to display the entire list again. If you mark Ignore case, the tags searched with the character(s) that you provided can be upper case as well as lower case.
If in the Search field you type a tag that does not exist yet, and you click Add, the new tag is forced in the field property, but no field definition is created in the concerning database, so use this option sparsely, it at all.
Change the name of an object
If you change the name of an object through its properties, the new name will also appear in the current node in the tree view to the left of the properties.
The other way around also works: if you select the name of an object in the tree view, and then click it again or press F2, you can edit the name in place. This is reflected immediately in the properties of the object. Sometimes you can change an object name this way, when the object properties show the name as read-only.
But be careful with changing names of properties. Currently, Axiell Designer does not do anything with the new name, even when there are many objects that refer to this object. So you'll have to find all references to the old name of the object in other objects and change them manually.
Moving through properties
You can easily move downwards through properties by pressing Tab on your keyboard, or Shift-Tab to move upwards.
Copying all label translations at once
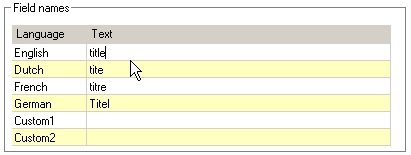
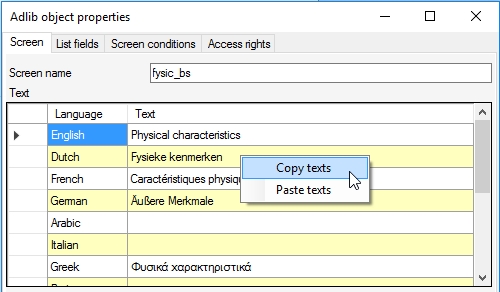
During application maintenance you often come across situations where you've added a new application object somewhere, a method for example, which should get the same label translations as some other object, a screen field maybe. From 7.4 you can copy all translations of an object label or name to any other object suited for translated labels or names. Simply right-click somewhere inside the relevant Text box in the properties of an object (such as a screen, a screen field, a method, a data dictionary field, a data source, etc.), and select Copy texts in the pop-up menu. Then open the label or name properties of your target object, right-click inside the desired Text box and select Paste texts in the pop-up menu. If you paste the copied texts into a Text box which already contains texts, then the Text box will first be emptied before the copied values are pasted.
Copying an entire enumerative list
An enumerative field often has a list of neutral values with user-friendly translations in different languages. If you have other enumerative fields that need to have the same enumerative list, then just right-click the list and select Copy in the pop-up menu. Now open the properties for one of the other enumerative fields, right-click their (empty) enumerative list and select Paste in the pop-up menu. If the list is not empty before you paste, the copied items will just be added to the existing list.
Note that enumerative fields which are in use as a merged-in field too, require that it's enumerative list is really identical to the enumerative field definition in the other database, so even the translations should be identical. Which is a good reason to use this copy function when you're creating enumerative lists that are supposed to be identical.
Editing mappings
On some properties tabs, like Linked field mapping, Enumeration values or Access rights, you'll find mappings of properties or objects, like combinations of source and destination fields to copy, or assignments of access rights to roles.
The appearance of mappings varies with the version of Designer and with the requirements of the mapping:
- In older versions of Designer (6.3.0 and older) you may see mappings accompanied by a button column to their right side: click the Add button to add a new entry in the mapping list; click Delete or Remove to delete the currently selected mapping entry; if Up and Down buttons are presents (for e.g. an enumeration mapping) you sort the mapping with these buttons.
- From Designer 6.5.0, you may encounter mappings or lists which always have a new empty line present, indicated by an asterisk in front of it: as soon as you enter a value, a second new line will be created automatically. To enter a value, just click the relevant entry field and start typing, or click the button with the ellipsis on the right side of the field to search for an existing value.
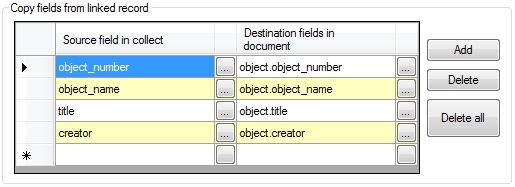
Most mappings in newer versions of Designer (from 6.5.0) no longer have a button column. In this case, all functionality for the relevant mapping is available in a pop-up menu which opens as soon as you right-click a line in the mapping.
When adding a new item or editing an existing entry, you sometimes have to choose options from drop-down lists that appear as soon as you select the property or object in the mapping, or you must choose an object from an objects list in a new window. In general, click the property or object in the mapping to edit it, and you'll be presented with the available choices. Sometimes you may also type a new value. See the Help topic for the concerning property for more information.
Managing roles
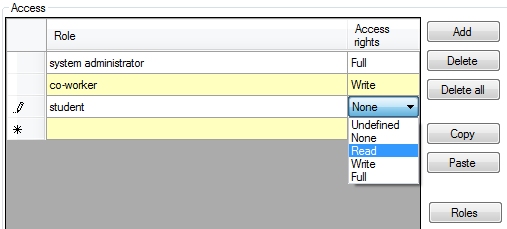
On the different Access rights tabs in Axiell Designer 6.5.0 or higher, you’ll find the Roles option in the pop-up menu: right-click a line in the mapping to open the pop-up menu. Choose that option to open the Current list of roles window. You are presented with an overview of all roles which are currently in use in your Collections system. Adding a new role from the Access rights tab can only be done in this window: just click the empty entry field and type the name of the new role. Now it is important that you move the cursor to the next empty line after you’ve entered the new role, otherwise the new role won’t be stored in memory. Close the window via the x button in the title bar.
The new role can be found in the drop-down list which opens when you want to select a role to assign access rights to.
Note that the new role will only be saved if you actually apply it somewhere in Collections, to assign access rights to an object. Moreover, the overview in Current list of roles will only be refreshed (put together again) when you restart Axiell Designer: redundant empty lines or roles which are no longer in use, will automatically disappear from the list. So you don’t need, and can’t delete roles manually: a role will be removed from the lists when it is no longer used.
Copying access rights
From Designer 6.5.0, roles and assigned rights set up for one application object, can be copied and pasted to other application objects, even to multiple objects at once. Moreover, copied roles and rights can be edited on a special clipboard, before you paste the access rights to other objects.
Proceed as follows to copy access rights from one object to others. First, right-click any of the lines with assigned access rights on the Access rights properties tab for the relevant object, and choose Copy in the pop-up menu which opens. This copies all access rights to the Access rights clipboard, which is really a skin around the Windows clipboard. You can view its content and edit it if you wish. Choose View > View rights clipboard in the menu to open the special clipboard. If you are satisfied with these access rights, then close the clipboard via the red-white cross in its title bar. However, you can still make changes first. Just like on the Access rights tab, you may edit roles and rights, add new rights through the Add in the pop-up menu, delete a selected line with Delete or delete all copied rights via Delete all, also from within the pop-up menu. After closing the Access rights clipboard viewer (if you had opened it), you may paste the copied access rights to other objects in several different ways:
- paste to a single object: open the Access rights tab of the other object, right-click the list and choose Paste in the pop-up menu. Or right-click the object in the tree structure of your Collections system in the left pane of the Application browser, and choose Paste access rights in the pop-up menu. Or right-click the object in a list in the right window pane of the Application browser, for instance a field list, and choose Paste access rights in the pop-up menu. Observe that access rights may also be copied or deleted from within such a list, via the pop-up menu.
- paste to multiple objects at once: in an objects list in the right window pane of the Application browser, you can select multiple objects. Keep Ctrl pressed down while clicking all objects you want to select, or click the first object and keep Shift pressed down while you click another object to select all in between objects at once. Then right-click one of the selected objects and choose Paste access rights in the pop-up menu to apply the copied access rights to all selected objects.
Note that all existing access rights of the target object will be overwritten when pasting!
By the way, it is not necessary per se to copy an object's access rights first. You may also begin by opening an empty Access rights clipboard viewer, and then add all desired access rights via Add in the pop-up menu.
See also
Managing databases and datasets